Installing and upgrading
This chapter concerns phpList self-hosted users only. If you have a registered account at the phpList Hosted service, please contact hosted@phpList.com.
- Installing phpList manually
- Automatic updater for phpList
- Installing using an auto-installer
- Configuration: verify settings
- Upgrading a manual installation
- Upgrading an auto-installed installation
- Common Installation Errors
- Modifying Administrator Permissions / Subadmins
Installing phpList manually
This page concerns phpList self-hosted users only. If you have a registered account at the phpList Hosted service, please contact hosted@phpList.com.
This chapter explains how to install phpList manually. You may wish to install it using an automated tool if one is available to you. See the auto-installation chapter for more information on this.
Overview of phpList installation
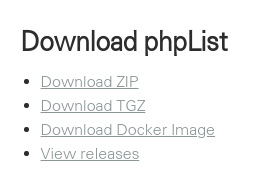
You can download phpList from:
- Download page
- SourceForge
- Docker Hub
phpList lives in its own folder called "lists." Manual installation follows these steps:
- Download phpList
- Unzip phpList
- Upload to your server using FTP
- Local Windows installation
- Create a database
- Add the database details to the config.php file
- Configure using web interface.
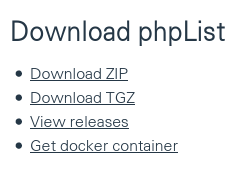
Download phpList
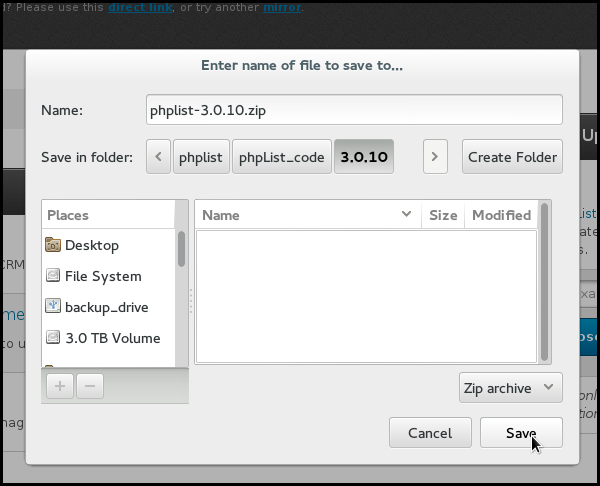
First check that your server meets the System Requirements. Then download the latest version of phpList from http://www.phplist.com/download by clicking either Download ZIP or Download TGZ.
The link will take you to SourceForge, where your download will begin after a few seconds. Depending on which browser you use, you may be asked to click Save before the download starts.
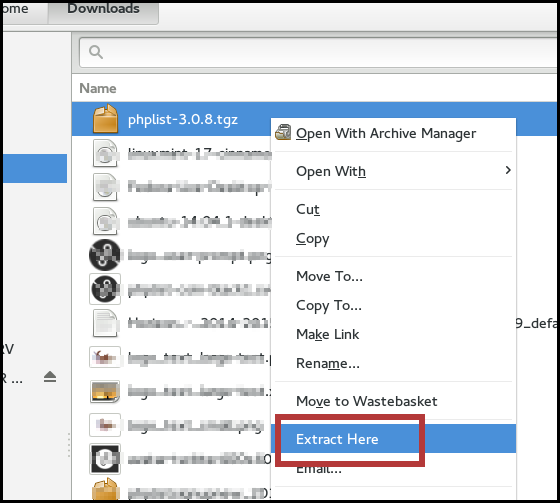
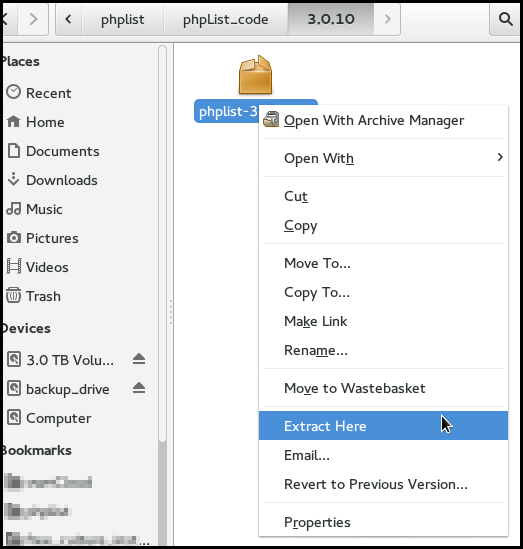
Unzip phpList
Once you have downloaded phpList to your computer, unpack it to a temporary folder. You can usually do this by right clicking and choosing Extract Here (Linux, as in screenshot), double clicking the folder (mac) or right click "extract all" (Windows).
Upload to your server using FTP
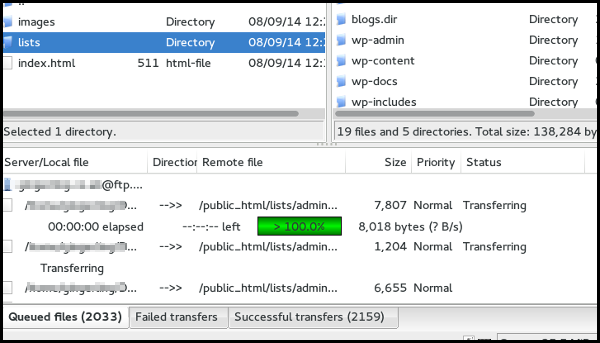
Start your favourite FTP program, in this case we are using FileZilla.
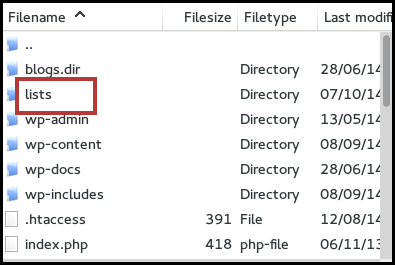
Browse through to your temporary folder in the FTP program, then open the public_html folder to find the lists folder.
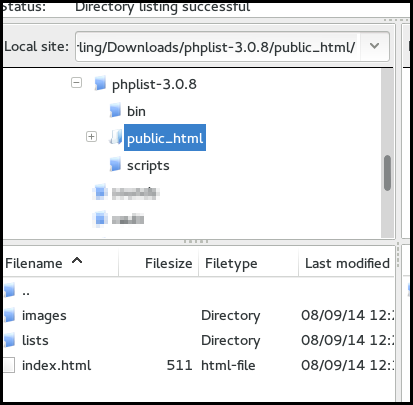
Upload this /lists folder into your public_html file on your server. This folder may have lots of files in it already. In the image below you can see the public_html folder on the server contains folders for a WordPress site.
Grab a Coffee!
This upload may take some time, you may even have to split it over a number of partial uploads depending on your connection speed, time outs and upload limits.
Local Windows installation
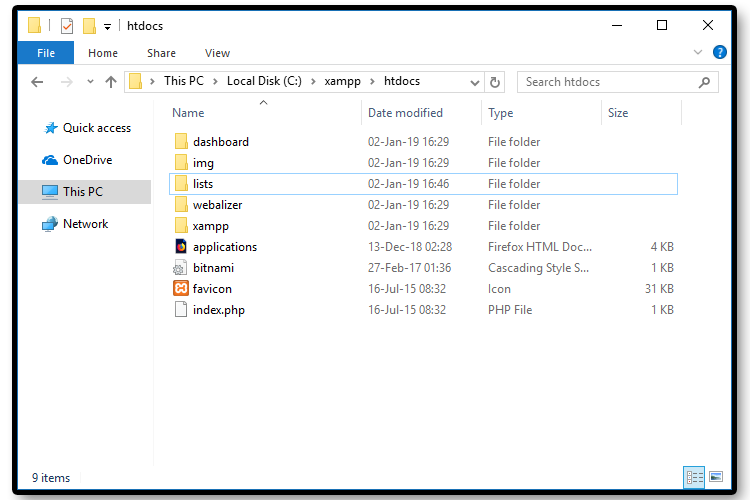
If you do not own a server or you want to develop locally, you can also install phpList on your Windows machine. First, you need to download the XAMPP package and install it in your PC. After installing, copy the /lists folder as stated in the previous section and paste it in the htdocs folder of XAMPP.
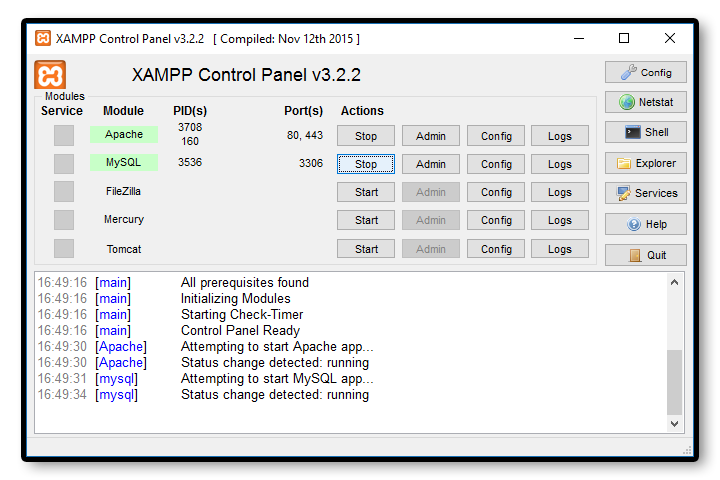
Next up, you must run the XAMPP Control Panel and start the Apache and MySQL server. Now we are ready to create a database for phpList on which to save the data.
Create a database using your control panel
Once you have uploaded the /lists directory, go to your hosting control panel or to the localhost from your browser and create a database. If you need help, your web hosting company can help you with this.
Whatever the process, you will always end up with three things:
- A database name, for example cl52-phplist
- A database username, for example phplist
- A password for your database, for example T!LcDaM/4
An example of creating a database
These screenshots provide an example. This may or may not be similar to the way you can create a new database on your server. That depends entirely on which software your hosting company uses.
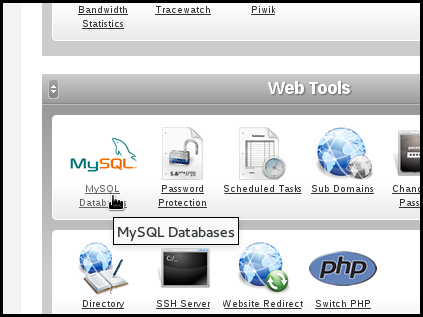
First click MySQL Databases.
Then type in the new database name (we used the name phpList) and enter or generate a strong password. Make sure you keep a copy of these details!
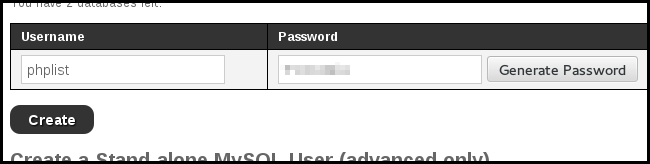
This system creates a user automatically, where the username is the same as the database name (a common preference). In other software you may need to add a new user separately and you may also need to allocate this user to your database.
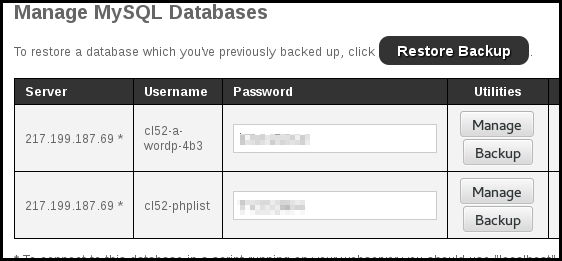
Your database is now ready. Copy down the details because you will need them in a moment.
Edit the phpList config.php file
Next, you need to put the details of your new database into your configuration file.
Browse your temp folder on your computer and go to lists > config > config.php. Load and edit this file in a text editor, such as Notepad (windows) TextEdit (mac) or Geany/Kate/Geddit/etc (Linux).
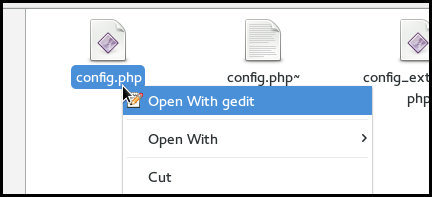
Never use a word processor program (like Microsoft Word), it will only generate formatting and disruption.
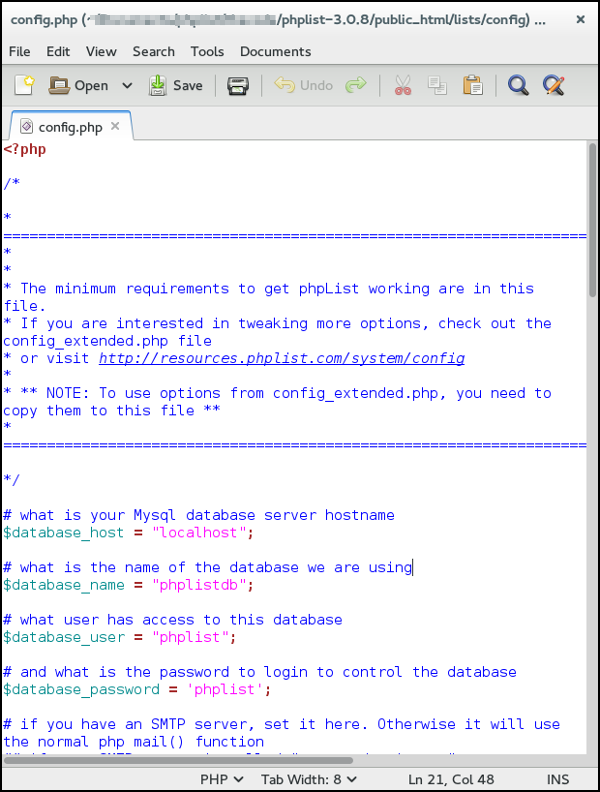
Your freshly downloaded config.php should look something like this:
Difference between config.php and config_extended.php
phpList only uses config.php so if you change any settings, please do so in this file. config_extended.php is there as that has pretty much every setting you can change stored within it.
If you wish to use the full configuration file you can rename config.php to config.old.php and then rename config_extended.php to config.php and use this file to make your changes.
To summarize, config.php is there as basically “a quick start” file, this contains the minimum settings you need to set phpList up and if a setting is not set, phpList uses a predefined value that “fits most”.
If your setup needs more tweaking, or you have specialized needs, then either
- use the extended file, renaming as described above
- copy and paste the relevant settings into the smaller config.php file
There are four places where you need to replace the word in "quotes" at the end of a line of code with something specific to your server:
What is your Mysql database server hostname
$database_host = "localhost";
If you do not know what to enter here, you will either need to use trial and error, or ask your hosting provider what to put here. If you want to keep things simple, ask your hosting provider.
Trial and error:
You may be lucky in that your server allows "localhost" for your $database_host entry, in which case you don't need to make a change (this was true in our example below). The second option to try is "127.0.0.1".
If these fail you will receive an error towards the end of installation. If both of these fail then this entry must be something specific to your server. GoDaddy and 1&1 servers are pretty specific, for example.
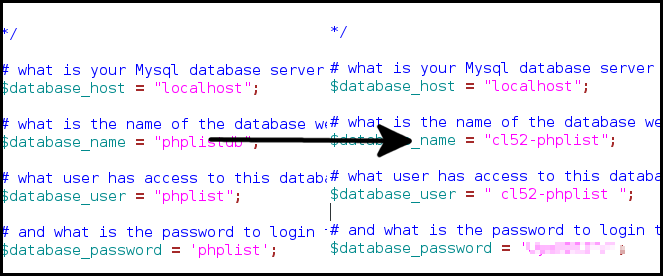
What is the name of the database we are using
xxxxxxxxxx
$database_name = "phplistdb";
Replace the phplistdb with the name of your database that you set up earlier. In our example below this is cl52-phplist.
xxxxxxxxxx
# what user has access to this database $database_user = "phplist";
Replace thephplistwith the name of your databse user you set up earlier (this may be the same name as your database). In our example below this is also cl52-phplist.
# and what is the password to login to control the database $database_password = 'phplist';
xxxxxxxxxx
Replace the phplist with the password you created. The password in the example below is obscured.
Test mode in phpList: ("TEST",0)
One other thing you will need to do, either now or at some point in the future, is to change the value of TEST in this file. Until you do this, your install is essentially in "sandbox" mode, and will not fully function.
By default test is defined ("TEST",1). Change this to define ("TEST",0) to be able to send messages out.
This is done automatically in the auto installers.
Note that subscribers cannot confirm themselves while Test is enabled, as they will not receive confirmation emails, and therefore neither campaigns.
External SMTP servers
Often you will want or need to use an external mail server for handling phpList email, instead of your local machine (by default phpList uses PHP's built-in mail(); function).
To use an external SMTP server with standard STARTTLS settings, customise, then add these lines to your config.php file:
define('PHPMAILERHOST', 'mail.server.hostname');
$phpmailer_smtpuser = 'user@login.com';
$phpmailer_smtppassword = 'user_password';
define("PHPMAILERPORT",'587');
define("PHPMAILER_SECURE",'tls');
If the mail server is using a self-signed certificate, then you need to add the following as well:
xxxxxxxxxx
$phpmailer_smtpoptions = array(
'ssl' => array(
'verify_peer' => false,
'verify_peer_name' => false,
'allow_self_signed' => true
)
);
Config_extended.php
You may need to add some extra lines to your config.php. These extra lines are ready made for you in config_extended.php, which is in the same directory as config.php. Simply copy the lines you need and paste them below the others in config.php
Save and upload
Once you have edited the config.php file you need to save it and upload this new version to your server. This can be done in the same way as your initial upload: open your ftp client, find the lists/config/config.php file on your pc and then upload it to lists/config/config.php on your server.
Go to your installation
Open your web browser and go to your installation. This is located at http://mywebsite.co.uk/lists/admin.
If you get an error saying that the database has not connected, then check your config.php file again: a tiny error such as a space before/after your database name/password will stop this from working.
When you see the grey and black interface with the phpList logo at the top, you are in the right place.
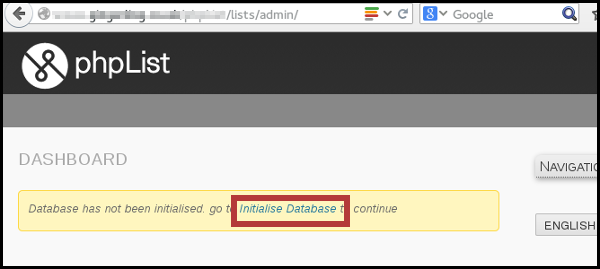
Or on your right, choose Initialize database under the Config option.

After version 3.6.6, as an administrator you are also able to initialize your database from the command line.
The final steps
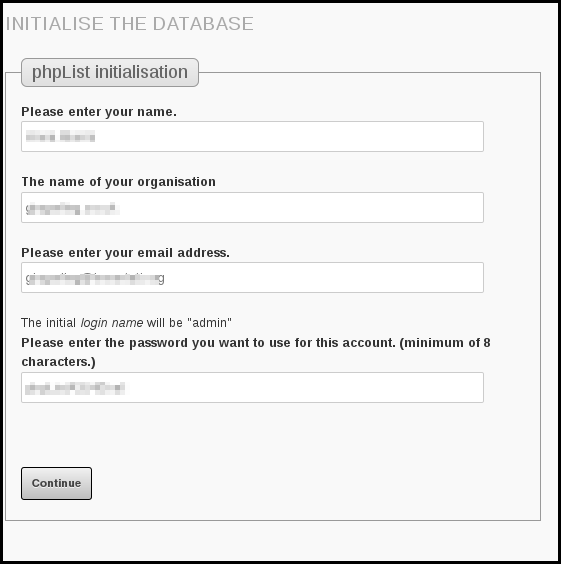
Click Initialise Database and fill out the form.
Click Continue
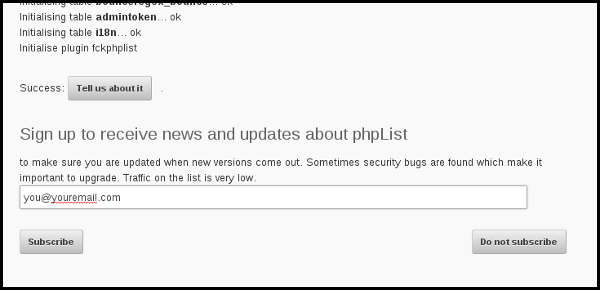
- If you would like to email phpList to let us know you are using the software, click Tell us about it.
- We recommend that you sign up to receive email announcements about new versions of phpList. You can enter your email and click Subscribe. If you do not want to sign up, for example because you are already on the list, then click Do not subscribe.
Finally click to continue with phpList seutp.
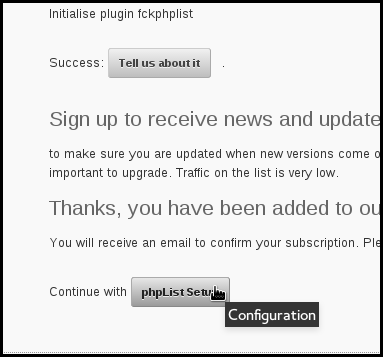
You're done!
You have now finished installation, and the next step is configuration.
Downloading phpList from the command line
The wget command
To download the phpList files you can use the wget from a Unix-like command line. You can use the wget command as follows:
xxxxxxxxxx
wget [option]... [URL]...
In order to check further how to add more options to your command, you can check the GNU Wget 1.20 Manual or type "man wget" on your command line for a description of the command.
The scp command
scp copies files between hosts on a network. It uses ssh(1) for data transfer, and uses the same authentication and provides the same security as ssh(1). scp will ask for passwords or passphrases if they are needed for authentication. You can use the scp command as follows:
scp [OPTION] [user@]SRC_HOST:]file1 [user@]DEST_HOST:]file2
Here is a detailed guide on how to use the scp command.
Feedback
Discuss this chapter here.
Automatic updater for phpList
This page concerns phpList self-hosted users only. If you have a registered account at the phpList Hosted service, please contact hosted@phpList.com.
The Updater plugin is available in phoList 3.6.13+.
The new updater comes in the form of a plugin. The Updater plugin will identify whether there is a new phpList version available to install.
Visit the documentation wiki page on how to install and run the Updater plugin: https://resources.phplist.com/plugin/updater
From this line onward, the documentation does not apply any longer. This updater has been deprecated. The documentation below remains published for archive purposes only.
Provides an easy, automated, web-based update mechanism for phpList installations.
Usage
The phpList updater gives you an easy way to upgrade your installation via web interface. In just four steps you can update your installation to the latest release.
The Updater is available in phpList 3.3.7+.
Requirements
The automatic updater requires the following PHP extensions: curl, zip and pdo.
Steps
You have to be a superadmin in order to update phpList via Automatic Updater. The updater is currently performing the following steps. If one of those steps fail, you will have the possibility to correct the error and retry from the current step.
Initialise
On the first step, several checks are performed such as if there is an update available, integration check and permissions check.
- Check if there is an update available. If there is an Update Available you can continue to the next step.
- Check for write permissions. All phpList should be writable by the apache HTTP user in order for the automatic updater to work. The updater stops if it finds not writable files and lists them. To continue, change file permissions for listed ones and click next to try again.
- Integration check. Check whether all required phpList files are in place and also if unexpected files are present. The updater stops if it finds unexpected files (not from phpList default installation) and lists them. .
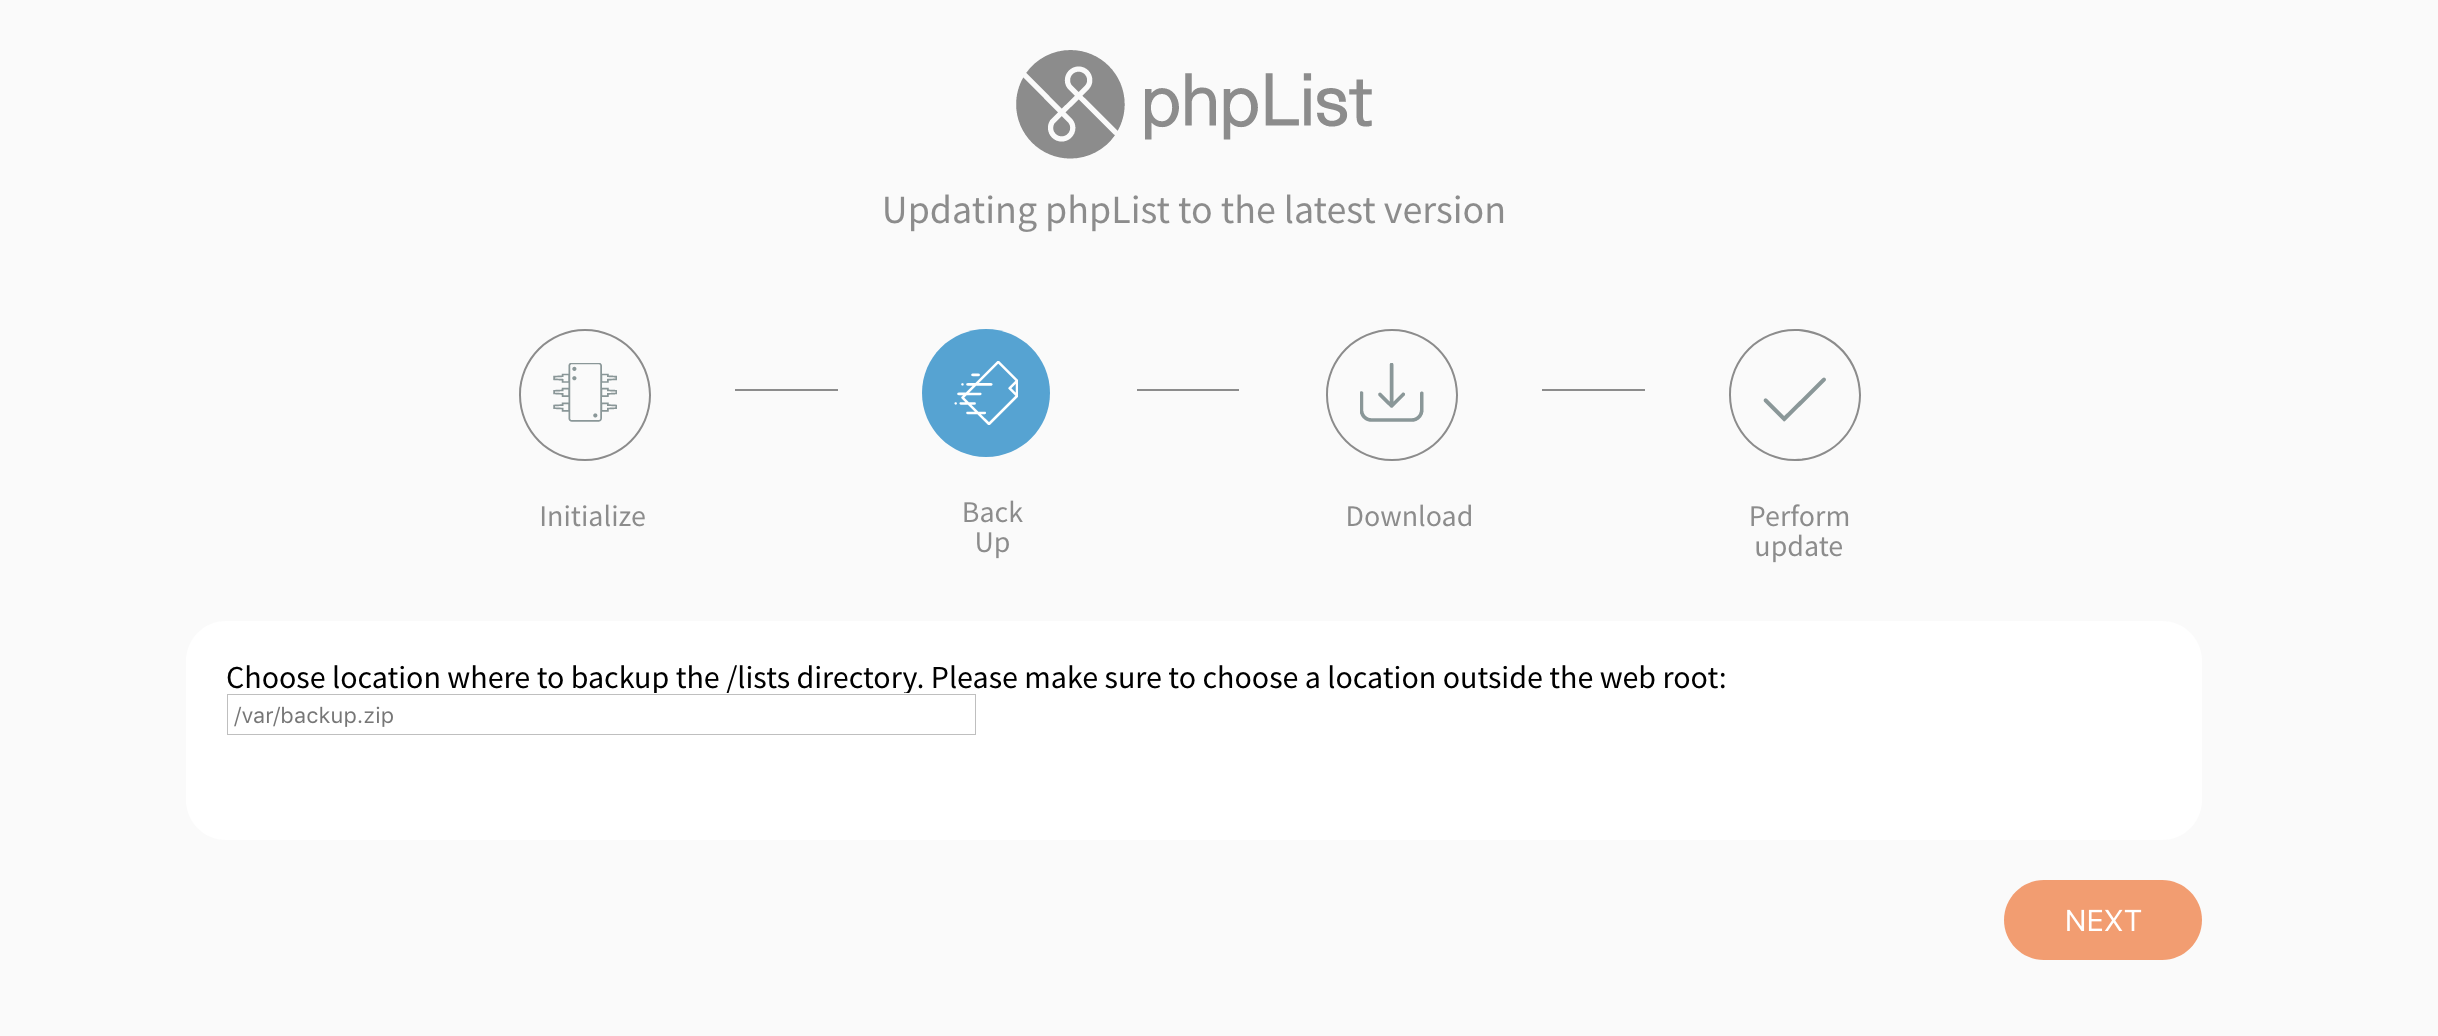
Back up
The user is asked whether they want a backup of the software. Please note that this is not a database back up. Back up is recommended for users that might have changed phpList files.
If you don't need to back up the software, please choose "No" and you will continue to the next step.
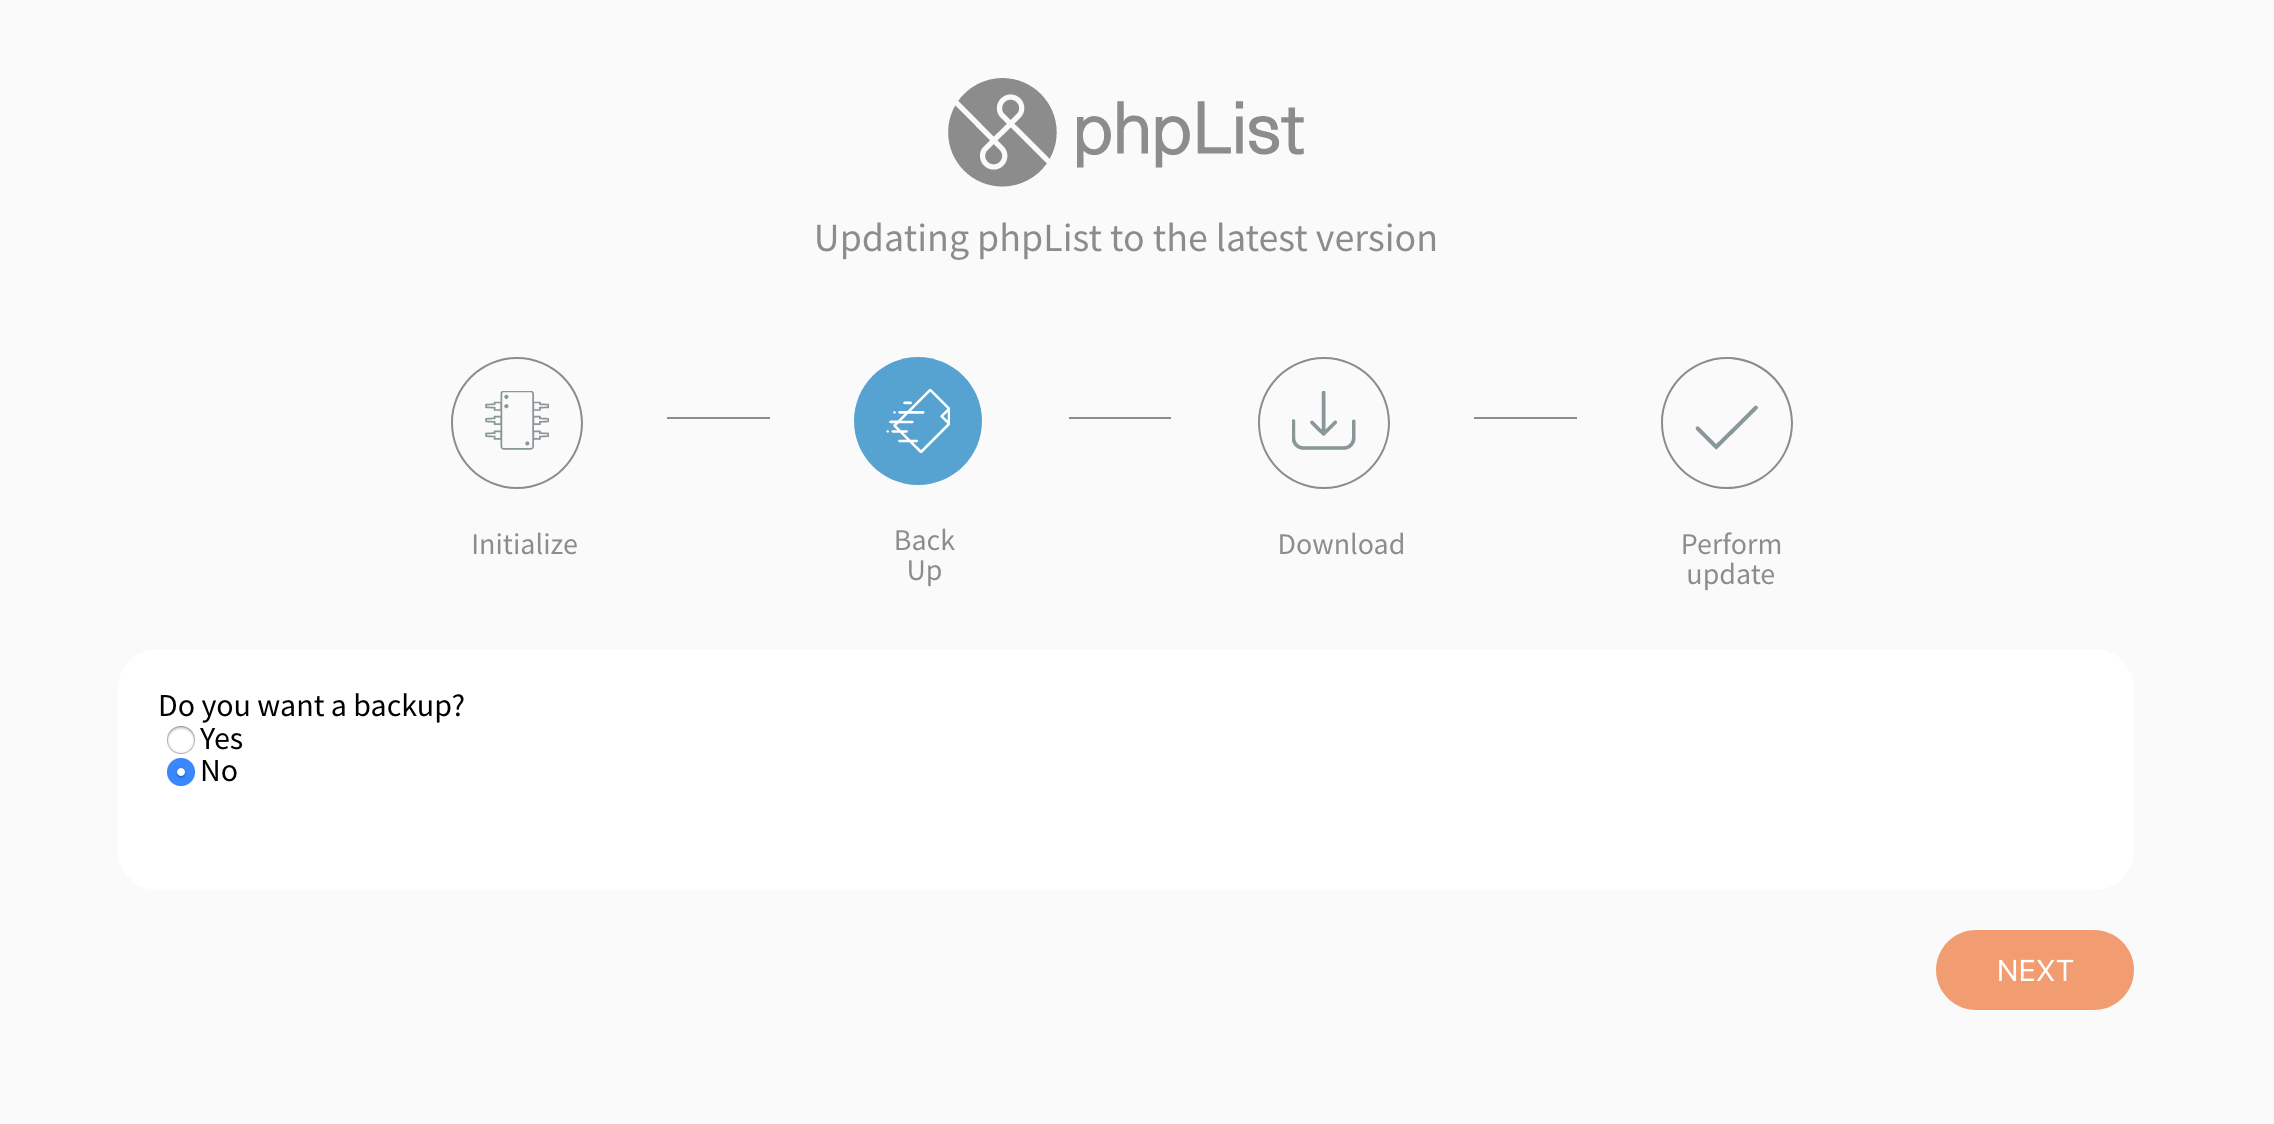
If you choose yes: the user is asked for the location where to store the zip file of the phpList software. The back up will be saved in the specified location. Please note that the specified location should be writable. If you see any error, please make the requested changes and click "Next" without refreshing the page. If the back up step fails, a manual backup of the files is recommended.
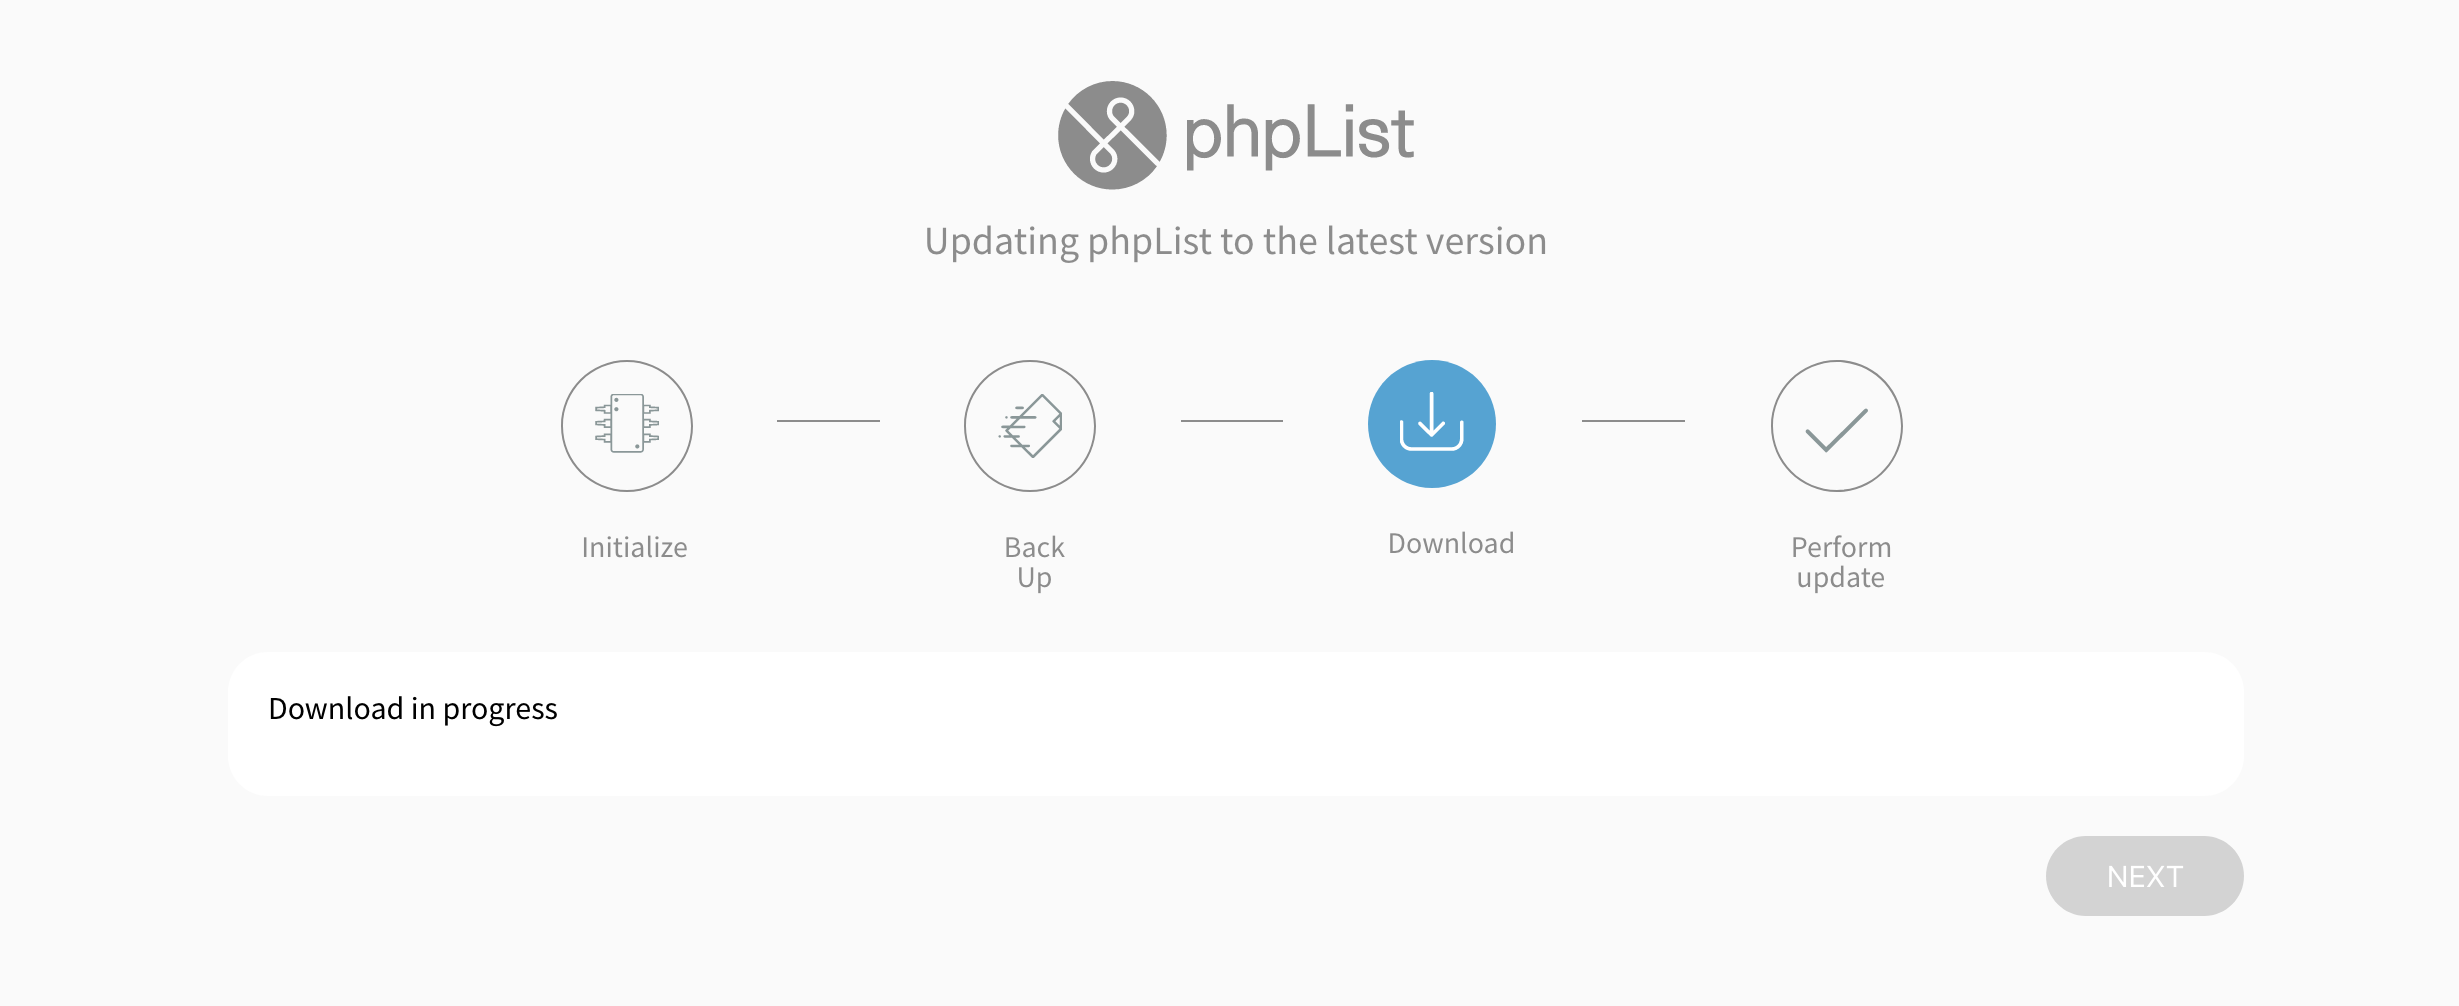
Download
The new version is downloaded to a temporary folder. Please wait until the download is finished.
Note: The automatic Updater doesn't check for available space before proceeding with the download and the update will fail if there is not enough space for all files. Depending on how many of the files were downloaded it can show "Downgrade is not supported".
Perform update
This is the last phase and several steps are performed in background without user interaction as listed below:
- The maintenance mode is enabled so that no other actions are performed while running the automatic updater.
- The PHP entry points are replaced with "Update in progress" message
- Old files are deleted except config, updater and temporary directory
- The new files are moved in place
- The new PHP entry points are moved in place
- The updater code is moved to a temporary directory
- The temporary files are deleted
- The maintenance mode is disabled
- The new updater code is moved in place
- The updated sessions is deauthenticated
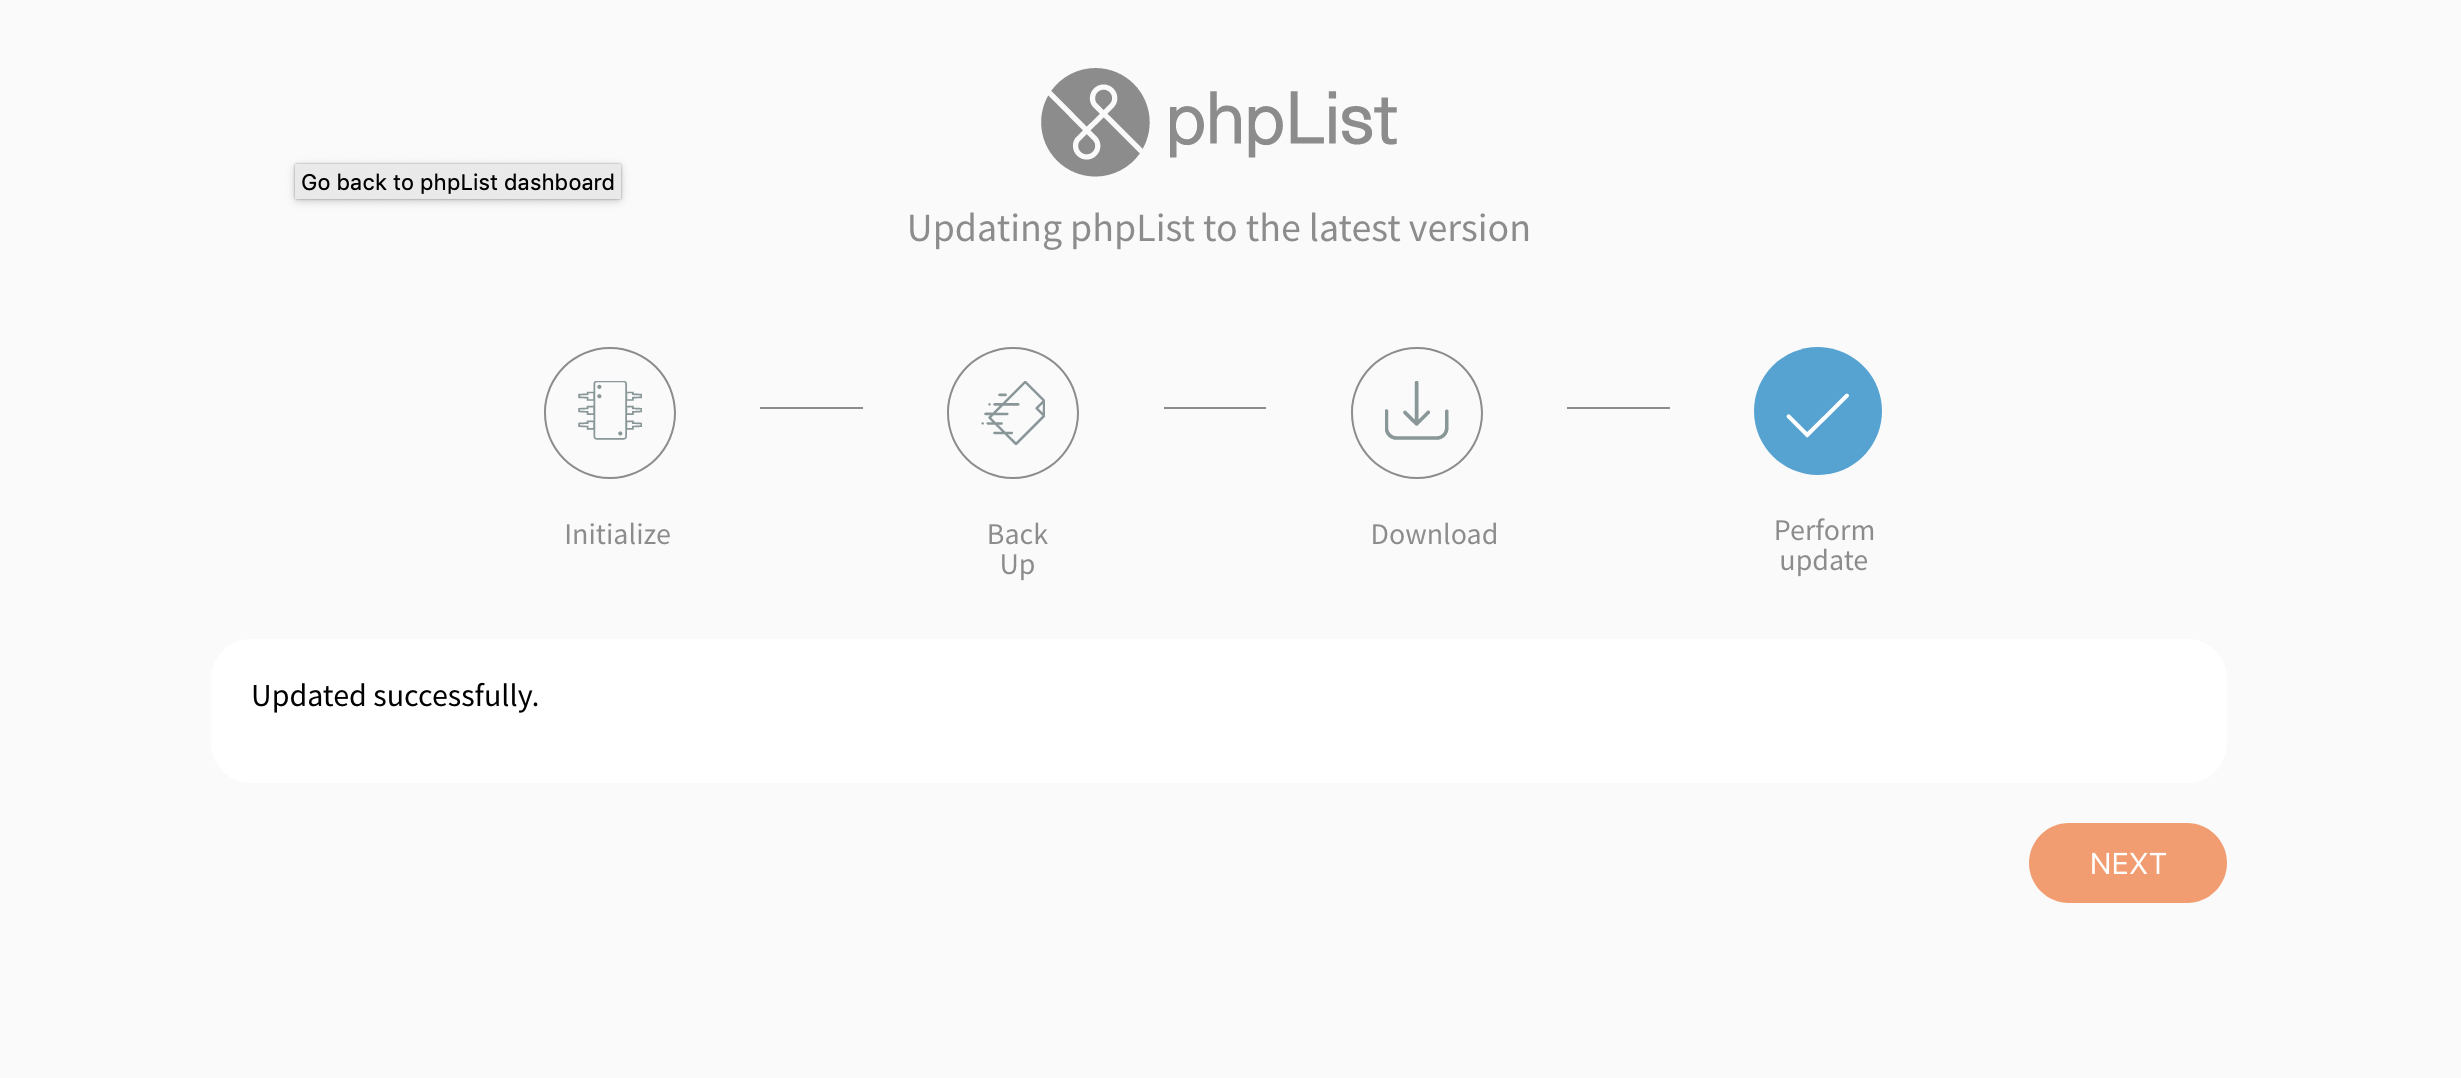
Done
"Updated successfully" is displayed. Redirect to the phpList dashboard by clicking "Next" button or alternatively click on phpList logo.
What the updater doesn't do
The updater is at the moment solely focused on replacing the files of the core installation. It does neither:
- Upgrade the database (this uses the existing database migration code)
- Upgrade the plugins (this uses the existing plugin updater)
Notes
- It is possible to override the backup checks by reloading the page when the backup check fails. Do not reload the page unless you wish to proceed without a backup in this case.
- When the update process fails you should manually remove actions.txt file inside the config folder in order to reset the process and be able to try again.
- The config directory is required to be writable because the "current step" of the automatic updater is saved inside it.
Disabling Automatic Updater
For admins who run phpList in a controlled environment it is necessary to be able to disable the automatic updater. To disable the automatic updater add the following in your config file:
define('ALLOW_UPDATER', false);
Report bugs
Please report issues here under automatic updater category.
Source code
The source code is available here . Feel free to contribute.
Installing using an auto-installer
This page concerns phpList self-hosted users only. If you have a registered account at the phpList Hosted service, please contact hosted@phpList.com.
Softaculous, Fantastico, etc
If your web provider offers Softaculous, Fantastico or other similar software installers, then you may choose to use the. These installers do the bulk of the work for you and can be faster than installing phpList manually.
Log on to your web space, (cPanel/Plesk etc) and click on Softaculous/Fantastico then find the phpList installation and choose the Install option. Please note, for this example I have used Softaculous installer.
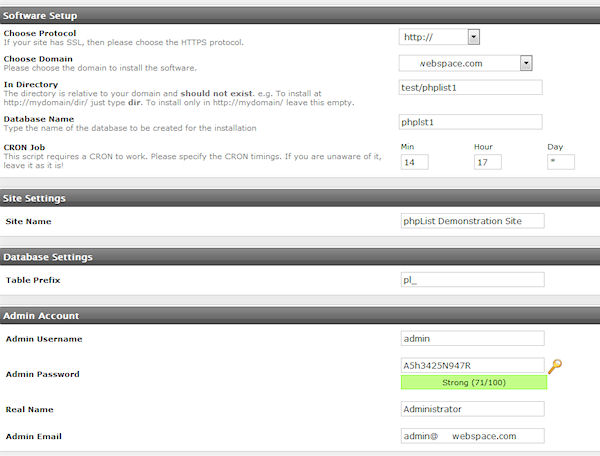
On the Install page you can choose your settings. In the order shown in the image:
- Protocol http:// is the norm
- Domain if you have more than one domain on your hosting/web space, choose that here
- Directory you should set the directory that you wish your phpList installation to be placed in. This should usually be left blank however in this example we are using test/phplist1. Any variations will become part of the URL to your phpList install, so it is best to keep it simple
- A database name is suggested next. You may change it within limits to a name that makes more sense to you if you wish. 8 characters are usually the maximum here as it will be prefixed to your hosting username (eg:user234_phplst1 in my example).
Important! If you have only one database available to all your websites, then it is very important to use a unique identifier here, one that makes sense to you as belonging to this phpList installation. If you have access to a number of databases, then it's an advantage to use one per installation.
- Ignore the settings for the Cron job for the time being, there is some information on this in a later chapter
- Site Settings: chose the name for your site, and change the default Table Prefix if you wish
- Finally, enter your username (admin by default), user password, make it a good strong one. Real name and email and then click on the Install button.
Wait for it to complete installing your phpList and you will get a final page offering the links to the public "front end" and the Admin "back end"
That's it, you've installed phpList with Softaculous or Fantastico.
One final thing to remember is that if you install phpList using this method, you can update phpList to a later version in a matter of minutes via the Update option offered in Softaculous/Fantastic. Do however make a backup of your config/config.php file before starting the update especially if you have customised your settings.
Feedback
Discuss this chapter here.
Configuration: verify settings
This page concerns phpList self-hosted users only. If you have a registered account at the phpList Hosted service, please contact hosted@phpList.com.
The configuration process starts after installation when you see this screen:

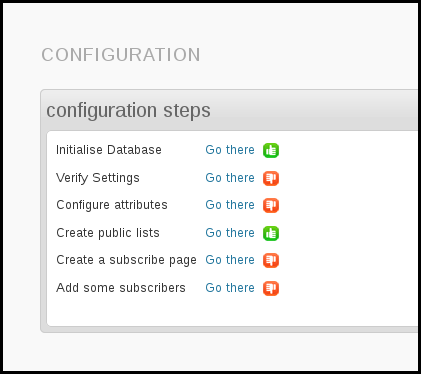
This chapter deals only with the Verify Settings instruction, because attributes, lists, subscribe pages and subscribers are dealt with in other chapters.
The Settings page discussed in this chapter is normally accessed through Config > Settings There are lots of settings you can change at any time, however, it's good to have an overview after install.
To start your settings verification click Go there next to Verify settings in your configuration overview, or navigate to Config > Settings from the main menu.
Please note you do not need to click save for every item, keep editing and click save just once at the end.
General Settings
These settings will have been completed for you during installation. This example is taken from a personal website/blog.

If any of these is incorrect, change it by clicking on the edit icon:

[WEBSITE] placeholder
Once you have set your website address, it will be used to complete the [website] placeholder if you use this in your template or content.
System settings
It is important that you keep your installation secure: this means keeping it uptodate. This setting, when set as "Yes" will notify you whenever a new Release Candidate is available. When you are notified of a new version, you should update as soon as you can for security reasons.

Security settings
On this section you will be able to see your secret for the remote queue processing. More details on the remote queue processing you will find on the Methods of Sending (Browser, Cron, Command-line) page.

Reporting settings
These settings establish who will be notified, by email, of events in your phpList install. These include system messages, such as notices of new subscribers, or reports such as when your campaign sending starts and finishes.

It may be that you have a team of people or just an individual, some standard emails, like name@mydomain.com, or specific secondary accounts, like phpList_admin@mydoimain.com.
You can change these settings any time, but it's good take some time to decide how you want to manage your system now.
You can also choose to send yourself notifications about subscriptions among other things. To edit this setting click the edit icon, choose Yes from the dropdown and click save changes.

Campaign settings
This section specifies many of the defaults for your campaigns, for example, which email to display in the From: line of your campaigns (the sender).

While you can change some of these options during the composition of each individual campaign, they will always display as stated here during the next new campaign.
If you will often use the same details, it is simpler and safer to specify them correctly here so you don't need to remember to add/edit these details every time you send a new campaign.
The settings regarding html template and the default footer are dealt with in the chapters about templates.
Transactional settings
These are the settings for the automatic emails that get sent by phpList to your subscribers when they perform an action. For example, when they subscribe or change their details. The emails in this section are usually noreply@mydomain.com.

Noreply is used because it is common for subscribers to reply to these emails, for example asking to be unsubscribed. Subscribers should be encouraged to use the automated processes provided by phpList, which can unsubscribe them without any additional work by the list manager (you!).
In addition to specifying the email addresses to be used for transactional messages, this section also deals with the content of these emails. These are ready-made for you, however, you may wish to customize them to reflect your circumstances or brand identity.
If you do this, make sure not to remove any of the important information included in the default messages, especially the placeholders in [square brackets].

subscription-ui settings
This section deals with the design of subscribe pages. This section is dealt with in the chapters on subscribe pages.

Segmentation settings
This section allows you to edit your list category organization. This is dealt with in the chapter about categories.
Subscription settings
This section provides you with the links to various functional pages within your phpList install. Most of the time you should not edit these settings. They provide a useful reference.
Composition settings
This area changes depending on which plugins you are using, and has some useful tweaks for your WYSIWYG editor. For example you can specify the width of the editor. This might be useful if you plan to compose your campaigns on a tablet computer or smart phone.
You're done!
You should now see a green thumbs up next to your settings verification. Don't forget, you can come back to this page at any time to update your settings, and refer back to this guide for help.

If you wish carry on with the rest of your set up, see the chapters corresponding to each item in the list, for example attributes or adding subscribers.
Feedback
Discuss this chapter here.
Upgrading a manual installation
This page concerns phpList self-hosted users only. If you have a registered account at the phpList Hosted service, please contact hosted@phpList.com.
You should upgrade your phpList installation frequently. By keeping up-to-date you can take advantage of the latest features in phpList which will make your work easier and help you advance your work.
Often, a new version will include security updates which are important to protect your data and the personal details of your subscribers.
Upgrading from phpList 2 (orange) to 3 (grey) works well - if you are still using phpList 2 please upgrade as soon as soon you can.
Overview
If you installed phpList manually, this is the correct installation method for you. The process consists of the following steps:
- Download the archive containing the new version to your server (e.g. to your home directory)
- Decompress the files
- Back up your database using your preferred method (e.g. using Mysqldump)
- Copy your config.php file
- Remove your old `lists` directory and replace it with the new one
- Copy your backed-up `config.php` file over the default one in the new `lists/config/` folder
- Login to the phpList admin interface and automatically upgrade the database following the prompt
When to update
You can sign up for email notification about new versions of phpList by subscribing to our announcements list.
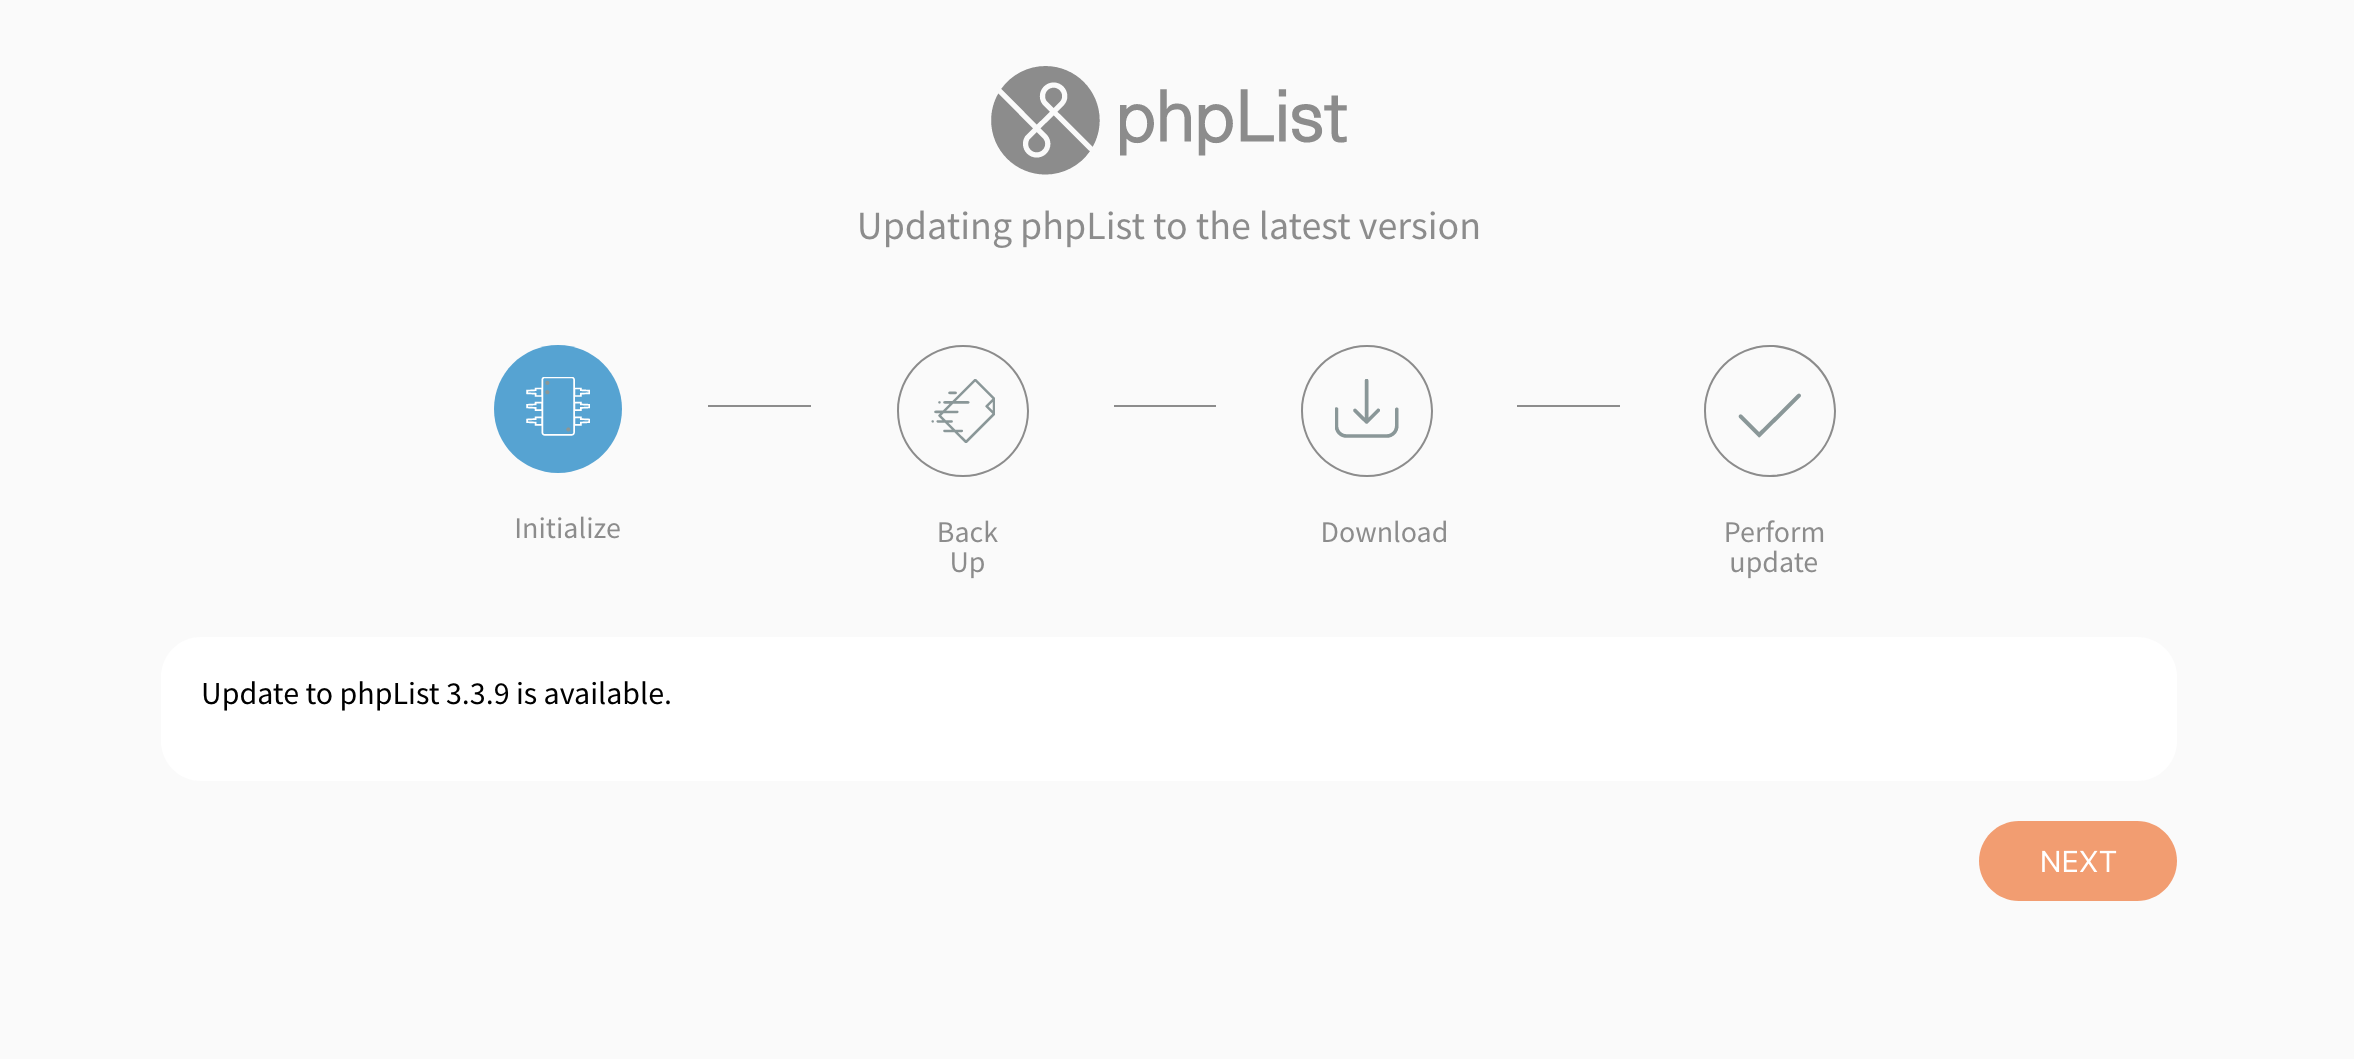
When normal configuration/settings have been maintained, phpList will check for updates every 7 days. You can adjust the frequency of checks on the Config > Settings page, accessed via the main menu.
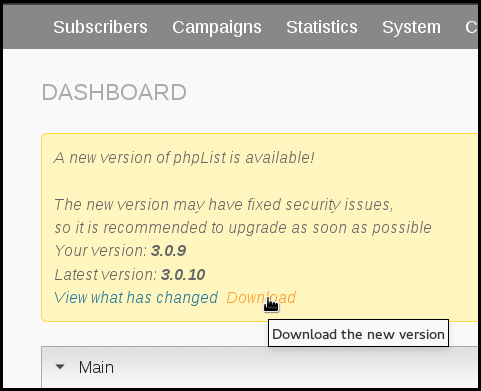
When a new version had been released you will receive a notice on your dashboard.
If you see a notification saying "A new version of phpList is available!" then it's time to upgrade.
Downloading the new version
From your Dashboard notification, click Download.
This will take you to www.phplist.org/download-phplist/, where you click DOWNLOAD ZIP or DOWNLOAD TGZ.
You will be redirected to SourceForge, where your download will start after a few seconds.
Choose a place on your computer to store the file and click Save (your own operating system/browser may work differently).
Unzipping phpList
Once you have downloaded phpList to your computer, unzip it. You can usually do this by right clicking and choosing Extract Here (Linux, as in screenshot), double clicking the folder (mac) or right click "extract all" (windows).
Next you must back up your installation, this is a vital step as it will keep your data safe is anything goes wrong with the upgrade process.
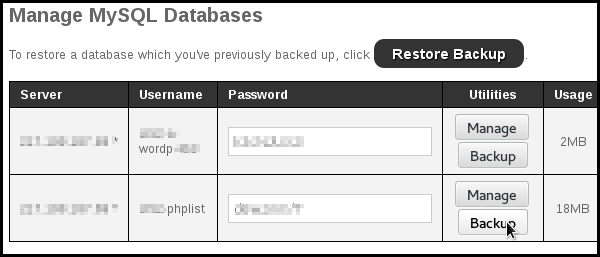
Back up your database
The method of doing this will depend on your hosting provider. In this example we use cpanel. Click on the MySQL Databases icon.

Locate your phpList database and click Backup.
Choose to Save File and click OK.
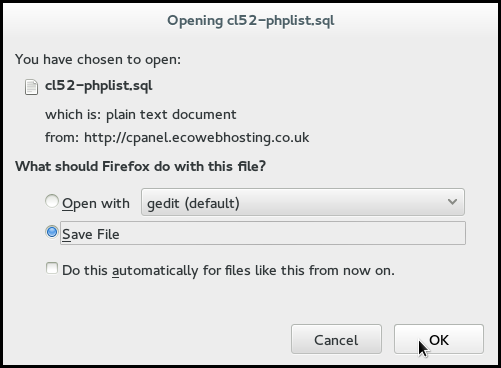
Choose a location on your computer to save your database too, and click Save.

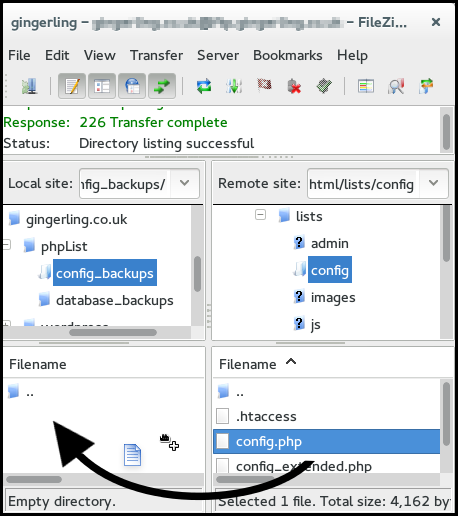
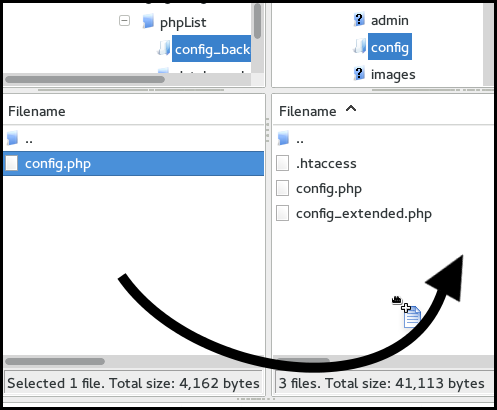
Backing up your config.php
You also need to back up your config.php., which is usually located at public_html/lists/config/config.php on your server. You will need this file again later.
You can do this using an FTP client. In the screenshot below we used Filezilla and the config.php file was simply dragged and dropped onto into the backup folder.
If you have customized/altered any other files for some non-standard scenario you should back them up too.
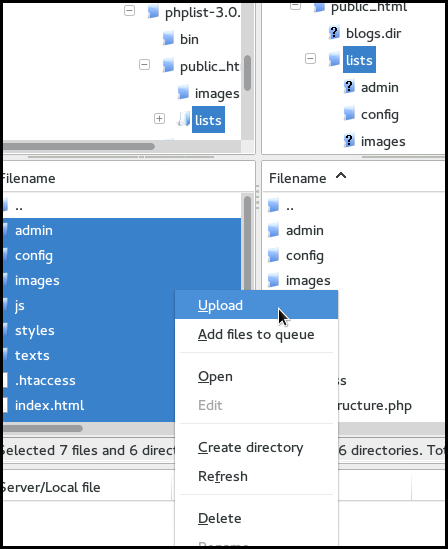
Upload the new version
Next, you need to upload the new version files to replace the files from the previous version. You can do this using an FTP client. This is similar to installing for the first time. In the screenshots below we used Filezilla.
First, we selected all the files within the public_html/lists folder on our pc, then we uploaded them to the public_html/lists folder on our server.
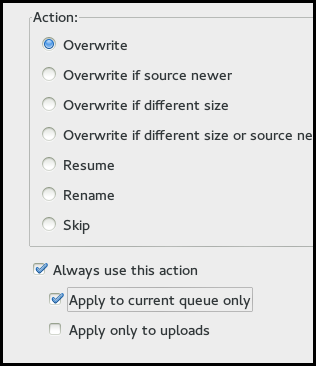
You need chose to overwrite all files.
Replace new config.php with your own
Now you need to replace the new config.php file with the one you backed-up earlier, which has your system details already set up.
We did this using an ftp client.
Update your database
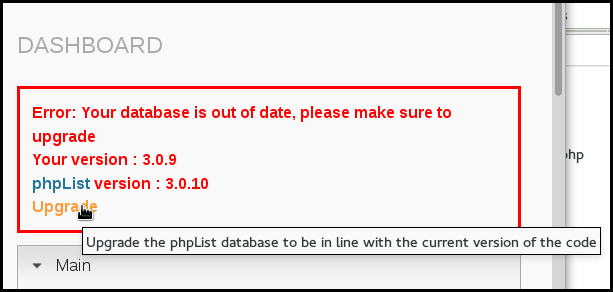
Finally, log in to your installation (http://yourdomain.com/lists/admin).
You will see a big red box at the top of the screen telling you to upgrade your database. Click Upgrade.
Read the text, and click Upgrade.
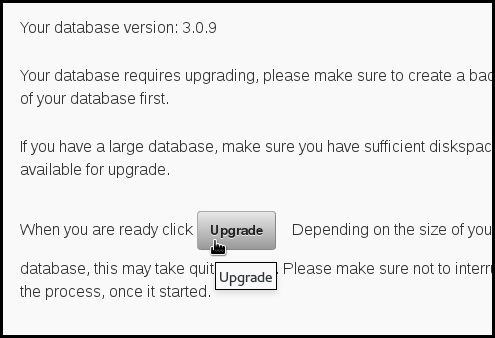
You will see a progress bar, and when the process has finished you will be told that you have successfully upgraded.

Feedback
Discuss this chapter here.
Upgrading an auto-installed installation
This page concerns phpList self-hosted users only. If you have a registered account at the phpList Hosted service, please contact hosted@phpList.com.
Auto Installer Upgrade.
Providing you have used your web based auto installer (Softaculous/Fantastico) to initially install your phpList, you can simply update it by visiting the installers page and click on the upgrade link. NB: This will only appear when an update is available.
Simply click the green upgrade icon and let the system upgrade your installation. Once completed, simply restore your customised files and the upgrade is complete.
Feedback
Discuss this chapter here.
Common Installation Errors
This page concerns phpList self-hosted users only. If you have a registered account at the phpList Hosted service, please contact hosted@phpList.com.
Possible Errors
Error 500:
The .htaccess file must be present in the lists/ directory and must contain the line "DirectoryIndex index.php" as this ensures phpList looks for index.php rather than the default index.htm(l).
Also because this file tries to be all things to all servers if you get an Error 500 report when first running phpList the issue could be that there are lines that start "php_value" they have a better than 50:50 chance of crashing your installation with the dreaded Error 500. In this case, either remove the lines completely or add a hash "#" to the start of any lines beginning with php_value (so it would look like this #php_value) and resave the .htaccess file.
MySQLi error:
If you receive an error referring to MySQL or MySQL then you need to change this line
$database_module = "mysql.inc"to
$database_module = "mysqli.inc" the line in question is around 700-710 of the full config.php file
From version 5.5 of PHP, the mysql_ functions have been deprecated.
Feedback
Discuss this chapter here.
Modifying Administrator Permissions / Subadmins
The administrator (You – throughout the guides) is responsible for managing an individual instance of phpList. Not all admins have equal rights. Some can use all the functions in phpList, some can only use a few functions. These rights are called permissions, and they are set by SuperAdmins.
SuperAdmins have all permissions on the system: They can create, edit and remove administrators, and change the admins' permissions, including the permissions of other SuperAdmins. Restricted Admins, on the other hand, are admins who have restricted permissions on the system. Example: One admin may be allowed to send messages, another may be allowed to view users, etc. It is important to set the permissions properly depending on the needs of your admin.
Permissions, or admin privileges can be set during the process of modifying an Admin’s functions. This can be performed in a variety of ways. You can access ‘Manage administrators’, 'Import administrators', and 'Configure administrator attribute' from the dashboard in the “Config” option on the left of your screen.
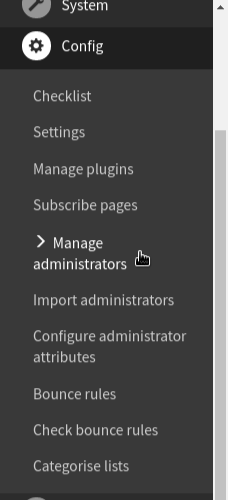
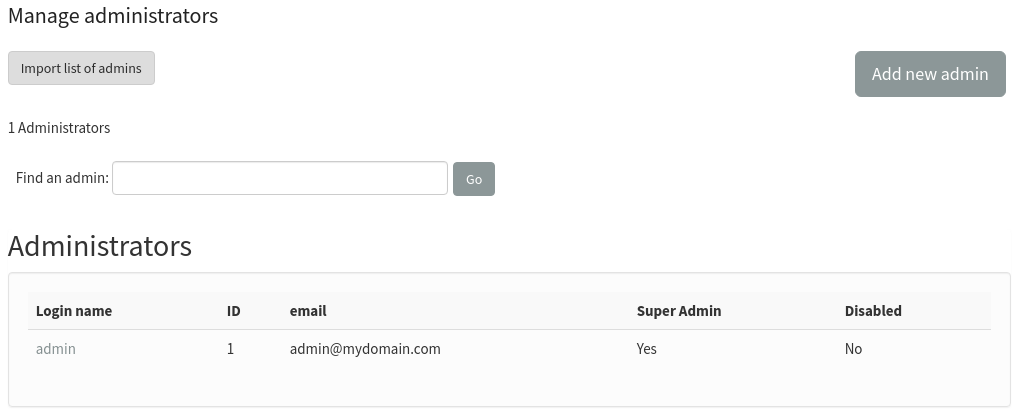
Manage administrators
Select the “Config” menu dropdown in the title bar, and choose Manage Administrators. The Manage Administrators page displays the current users with administrator privileges. From this page, you can search to find an administrator, add a new administrator, or import a list of admins. By default the only administrator is that one account which was used when you initially installed phpList.
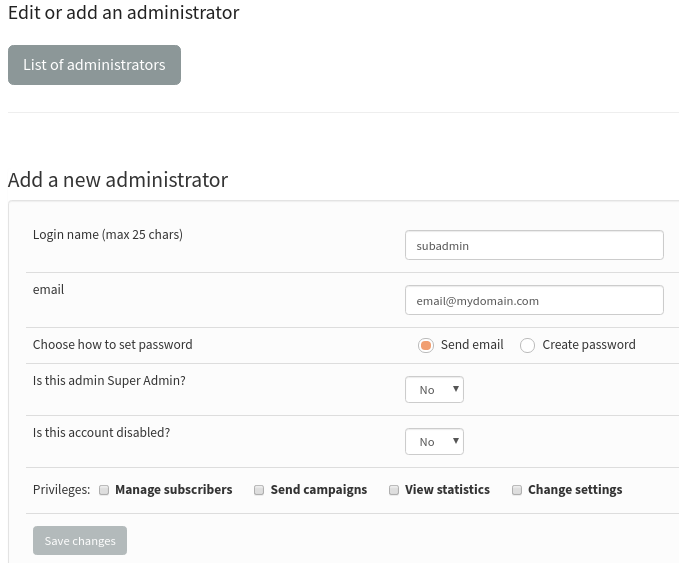
The “Add new admin” page provides you with a variety of fields that need to be filled. Fill out the corresponding fields and select the appropriate privileges for this administrator by selecting or removing checkmarks next to the privileges section. Check “Yes” for the update password in order to send a reset password link on the email set for the sub-admin. Select Save Changes to finalize the creation of the new administrator.
Import administrators
Instead of adding multiple admins one-by-one, you can import a list of admins directly by importing a file. The columns need to have the following headers: email, loginname, password. Any other columns will be added as admin attributes. Warning: the file needs to be plain text. Do not upload binary files like a Word Document.

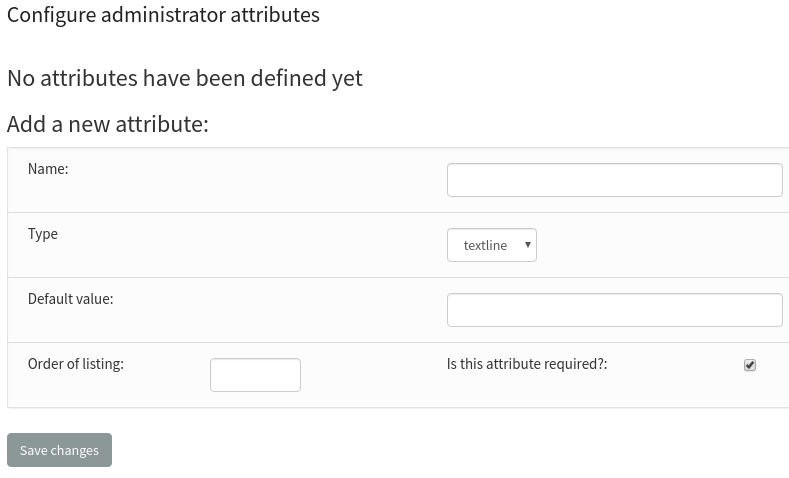
Configure administrator attributes
Configure admin attributes by either navigating through the ‘Config’ and selecting Configure Attributes for Administrators from the dashboard. Administrator attributes are similar to attributes for subscribers, but they pertain to a different “user.”