A new plugin, submitByMail, allows you to compose your campaigns in your email client, for example in Thunderbird or Outlook, and then submit them to phpList by email before sending. This plugin is an early beta version: it has been thoroughly debugged but has not yet been tested in the field. As the author, I am looking for people to do beta testing on the plugin.
Feature overview
- You can give each/any of your lists in phpList it’s own email address for the submission of messages.
- As a security measure, you have the option of requiring senders to confirm each of their submissions.
- Messages may contain attachments, if your phpList installation is configured to allow attachments.
- Messages and attachments are checked for acceptability before they are processed.
- A list can be configured to save acceptable messages as a draft or to queue them immediately.
Security
Security was an important consideration in the development of the plugin:
- The plugin can only be activated if phpList is running on a secure https connection.
- Submitted messages can be collected by a Unix/Linux pipe from the mailbox receiving the message, if this is possible on a particular installation.
- Otherwise messages must be collected on a secure POP connection (TLS/SSL).
Spread the word
Share or like on facebook, re-tweet on twitter, on google+ and on reddit.
Test and feedback
This plugin is an early beta version that has been thoroughly debugged, but has not yet been tested in the field. As the author, I am looking for people to do beta testing on the plugin. Below are instructions for installation and use of the plugin, at the end I explain how to give feedback.
Installing the Plugin
The submitByMailPlugin is available from my respository. If you are using a later version of phpList (3.06+) you should be able to install the plugin with the phpList plugin installer. The plugin requires both the PHP imap extension and the PEAR Mail_mimeDecode package. If these prerequisites are not present, you can still install the plugin, but you will not be able to activate it. Also you will not be able to activate the plugin unless you have a secure connection using https.
You can install the plugin manually by downloading submitByMailPlugin.php and the submitByMailPlugin subdirectory from my repository, and then uploading the files to the plugin directory of you phpList installation. Please make sure that the .htaccess file is included in the download. This file must be in the submitByMailPlugin subdirectory after installing the plugin. Otherwise you will not be able to configure mailing lists for email submission.
Configuring the Plugin
After installing the plugin, check that the settings are appropriate for use. After selecting Settings in the phpList config menu, you will find the settings for this plugin at the bottom of the ‘Campaign’ category, as shown in the image accompanying image.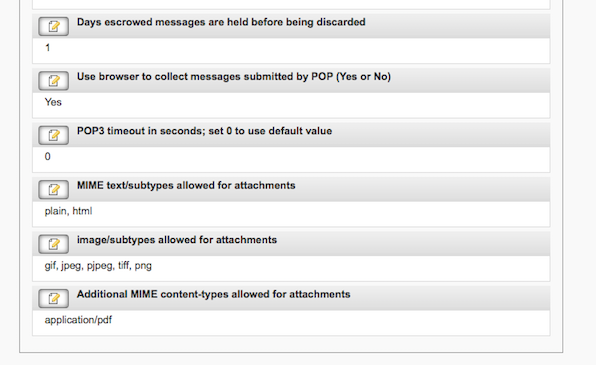
The first setting is the number of days that you want messages to be held held for confirmation. The default is one day, but you can set any time up to 7 days
If the second option is set to ‘Yes’, you can use your browser to collect submitted messages similarly to the way the browser can be used to process the queue.
The third option is the time out for the internet connection to a mailbox in seconds. You can set any time up to 120 seconds. Set zero to accept the time out specified in the php.ini file for your setup. Normally you should not have to change this setting.
You will see the next three settings only if your phpList configuration allows attachments. They specify the MIME types accepted by the plugin.
Configure a List for Email Submission
Go to the dashboard. You should find the Plugins menu on the dashboard beneath the Campaign functions menu as seen in the accompanying image.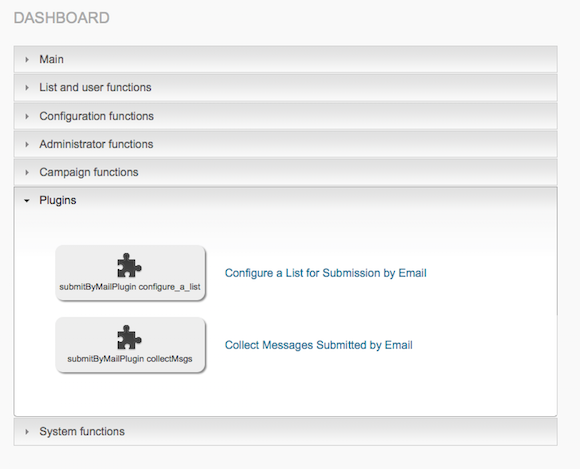
The selection Configure a List for Submission by Email will lead you to a page from which you can configure any of the lists that have been set up in your installation. On this page you will find a table of list ID’s, list names, and submission addresses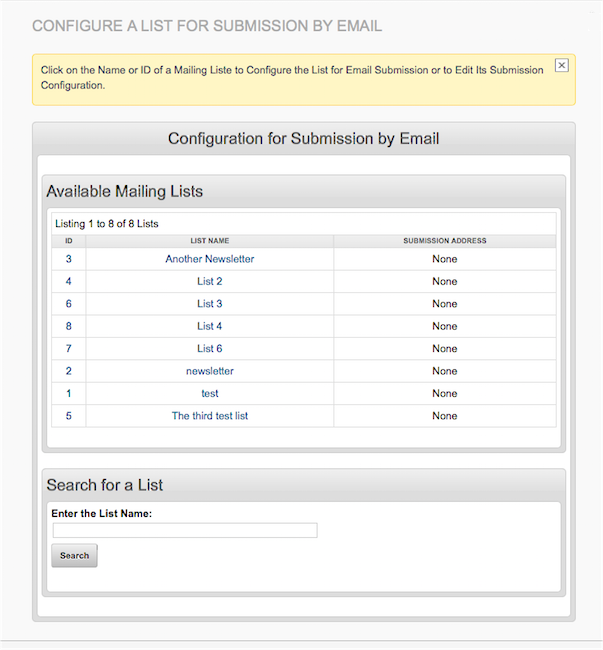
Of course, the submission addresses all read None at the start, because no list has been configured yet. Click on a list name or a list ID to select the list you want to configure. That will bring you to the page shown in the next image.
Suppose you choose to configure the “newsletter” list. You be brought to the page shown in the image to the left. By Submission by mail allowed, click the radio button marked Yes. By Collection method, accept the POP3 with SSL/TLS default. Then into the box by Submission Address enter the email address to which you messages want to be submitted, for example, ournewsletter@example.com. Then enter into the password box, the password required to access the account corresponding to the submission address.
Into the next box labelled Mail Submission POP3 Server enter the mail server serving the submission account. That server might be perhaps “example.com” or “mail.example.com,” or something else. Consult the documentation for your hosting service. Please do not enter a port number; the plugin sets the port to 995, the standard port for secure POP3 service.
What do you want to do with messages submitted to ournewsletter@example.com? Save is the default; messages submitted will be saved as a draft. Click the button marked Queue to have the messages queued immediately for distribution to the list. The next pair of buttons are labelled Confirm submission; Yes is the default — submitted messages will be held (“escrowed”) for confirmation by the sender who must be the list owner or a superuser.. Click No if you don’t think such confirmation is necessary.
Note: in terms of security it is a bad idea to queue messages directly without confirmation. You can do this if you want, but you had better be very confident that the submission address will not somehow become public, and that the list owner or a superuser cannot have their addresses spoofed. To repeat, if you allow messages to be queued without confirmation, any message sent to the submission address, spoofing the list owner or a superuser, will be distributed to your subscribers without review.
The last two selections on this page allow you to define a footer and select a template for messages sent through the submission address.
Click the Save button you save the information that you have entered. You will have to wait a short length of time while the plugin verifies the mail account that you have entered for the list. If everything is OK you will be returned to the previous page, where you can configure another list if you want. If the mail account does not verify, you will be notified and will remain on the same page, so that you can correct the information.
Configuring for a Pipe
If you want messages to be submitted to your list through a pipe, then click the Pipe button by Collection Method. When you do this, the Password and Server boxes will disappear.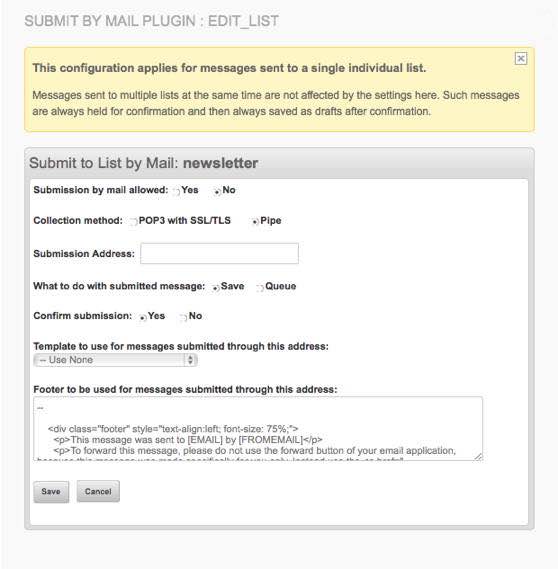 The image shows the appearance of the page after clicking on the Pipe button.
The entries following the submission address are the same then as discussed before. When you click the Save button, the plugin will validate the form of the email address. You will be notified if something is wrong. You will remain on the page so that you can correct the information. Otherwise you will be returned to the previous page. Note that it is only the form of the address that is checked. We cannot easily verify that the specified address actually corresponds to an active email account served by a legitimate email provider. So please check the email address carefully; the plugin will not be able to catch every typo.
Collecting Messages
If the messages submitted by email are actually going to be submitted to the various lists that you have configured, the messages are going to have to be collected from their respective mailboxes. There are three ways of doing this — by pipe, by manual collection of POP messages, or collection of POP messages with a cron job.
Collecting Messages from a Mailbox with a Pipe
Messages collected with a pipe are submitted to phpList as soon as they arrive at the mailbox. You can set up to pipe messages to a list as follows.
Hosting services using cPanel commonly allow you to attach a filter to a mail account. One of the options for such a filter is Pipe to a program. You should select that option.
Let’s say that the account is ournewsletter@example.com. Also you need your web root directory, which might be something like /home/myID/public_html. Let’s just call it /webroot. Assuming the phpList files are in the lists directory, that the configuration file or phpList is in its default location, and that the PHP binary is in the /usr/bin directory, then you’d want to pipe messages from the account to the following Linux/Unix script:
/usr/bin/php /webroot/lists/admin/index.php – c/webroot/lists/config/config.php -ppipeInMsg -msubmitByMailPlugin -eournewsletter@example.com > /dev/null 2>&1
You will need to adjust the individual items in the script to fit your installation.
Redirecting the standard and standard error outputs to /dev/null will prevent the script from attempting to write any output to the terminal. For messages to be accepted, the -e option specifying the mailbox connected to the pipe is required.
Messages will be accepted from a pipe only if the pipe collection method is specified for the list receiving the message.
Note: I have just found that on BlueHost.com, instead of putting /usr/bin/php or some such thing into your pipe script, you have to simply write php-cli without otherwise specifying any location for the php binary. The same is true for a cron job. How you do a pipe or setup a cron job depends very much on your hosting service!
Manual Collection of POP Messages
You can collect messages a browser by selecting Collect Messages Submitted by Email in the Plugins menu on the dashboard. Note: this item will appear in the menu only if you have answered Yes in the setting Use browser to collect messages submitted by POP.
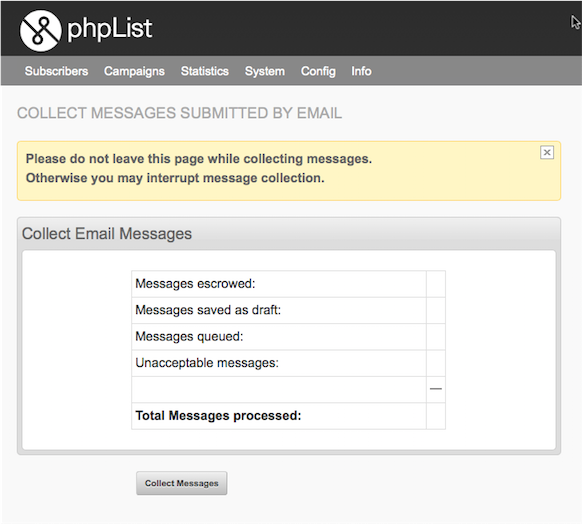 This will bring you to the page shown in the image. Click the button labelled Collect Messages. This will start the message collection. The button will disappear, and the table on the page will be continually updated as messages are collected from the different mailboxes by POP. When message collection is done, the Collect Messages button will be replaced by a View Event Log button so that you can view the results of message collection in the Event Log. If one or more connections are broken or time out, you will see an entry in red at the bottom of the table giving the number of these events that have occurred.
Automated Message Collection with a Cron Job
Most hosting services make it easy to run a script at specified times with cron. Consult the documentation for your service for directions. Setting up a script for a cron job is very similar to setting up a pipe. The difference is that the -e option is unnecessary, and the page called is collectMsgs rather than pipeInMsg. So, with the same assumptions as before, the script would be:
/usr/bin/php /webroot/lists/admin/index.php – c/webroot/lists/config/config.php -pcollectMsgs -msubmitByMailPlugin > /dev/null 2>&1
Again, you will need to adjust the items in this script for your particular installation.
If you run this script in the terminal, without redirecting the output, you will get a count of each of the different outcomes from processing the collected messages.
If you are already processing the message queue with a cron job, it is probably a good idea to avoid collecting messages at the same time you are processing the queue. It would probably be best to collect messages midway in the interval between the times that the message queue is processed.
Escrowed Messages
When messages are escrowed, the sender, that is, the list owner or a super user — whoever sent the message, is sent an email containing a link to a web page. If the sender then clicks on the link, the message will be processed. That is, it will either be queued or saved as a draft, depending on the configuration of the list to which the message has been submitted. The web page to which the sender is sent will give the outcome of that processing. If the sender does not respond by clicking on the link, the message will be held for the number of days specified in the hold time setting. After the expiration of the hold time, the message will be permanently deleted.
Security Considerations
Whether arriving messages are to be escrowed, saved, or queued, they are checked for acceptability before they are processed. Messages must come from an administrator. An ordinary list owner is not allowed to send messages to a list he/she does not own. Superusers, of course, can send messages to any list. Messages from non-administrators are discarded without notifying the sender.
This plugin will not work without a secure https connection. This is not an arbitrary requirement. I had strongly considered incorporating the ability to configure the plugin for an unsecured connection. Then the realization dawned that you are doing your subscribers no favours to run phpList over an insecure connection. phpList should only be run with https!
In general you should require confirmation for all messages submitted by email, to avoid a hacker submitting messages under the guise of an administrator. As an additional level of security, the plugin requires that all message sent to multiple lists be held for confirmation regardless of how the individual lists are configured.
Unless the message is escrowed, a sender will be notified of the disposition of the submitted message. As discussed before, when a message is escrowed, the sender is sent an email containing a link that confirms the message.
Error Messages
All actions of the plugin are logged in the event log. When there is a problem with a submitted message, an error message will be logged in the event log. The error messages described here are entered into the Event Log, and if possible, a version of the error message will be returned to the sender. These error messages in general result in the message being discarded.
Some of the error conditions described here seem unlikely, but I’ve tried to address every problem that might conceivably occur while the plugin is trying to deal with a message.
- Msg discarded: pipe not allowed for this list. This occurs when you attempt to pipe messages for a list not configured to allow it.
- Msg discarded: cannot decode. The plugin cannot make sense of the message or the attached MIME.
- Msg discarded: bad mailbox. The mailbox specified in the -e option does not match the submission address of the list addressed.
- Msg discarded: no lists addressed. The address in the To: field of the message does not match the submission address of a list.
- List <list name>: Msg discarded; unauthorized sender. The sender is not an administrator
- List <list name>: Msg discarded: sent to list(s) sender does not own. The sender is an administrator but not a superuser, and he(she) has addressed a list other than the lists he or she owns.
- List <list name>: Msg discarded; bad type for main message. The main message is allowed to be only text/plain or text/html. You cannot send a PDF except as an attachment.
- List <list name>: Msg discarded; mime type not allowed. The mime type of an attachment does not correspond to an acceptable mime type as configured in the settings. The only multipart types allowed are multipart/mixed, multipart/alternative, and multipart/related. This is hard coded and cannot be changed.
- List <list name>: Msg discarded; attachments not permitted. The message contains one or more attachments, but the phpList installation is configured to allow NO attachments.
- List <list name>: Msg discarded; mime nesting too deep. An attachment may be multipart including its own multipart attachment, which in turn include multipart attachment…. This plugin allows no mime more than three levels deep.
- List <list name>: Msg discarded; inline type not allowed. An attachment that is not text/plain or text/html, has been found without a file name and with “inline” as the specified disposition.
How to feed back
When an issue arises, please post a message on phpList-developers if you are a member of that list. Otherwise you can post a message to me through the “issues” button at my GitHub repository. The third option is to send a message to alesikar at my personal email provider, mac.com .
Thank you for your help.