Bounce Management
Introduction to bounce management
Whenever an email is sent via the internet, regardless of the email software used, the email is transmitted by an MTA (Mail Transport Agent). In most cases the MTA is the internet provider’s SMTP mail server, sending to the MTA of the email’s recipient, through intermediary MTAs.
If the email cannot be delivered to its recipient, the last MTA that tried to transmit the email generates an error email, called a bounce message, which is sent back to the sender’s email.
Usually, this bounce message contains a specific error code that explains why your email could not be delivered to its recipient.
phpList implements bounce management which handles these bounce messages, and provides automatic actions depending on the error code, like removing an incorrect email address.
Setting up basic bounce management
Basic bounce management counts bounces and unconfirms a user after a given number of consecutive bounces.
Setting your bounce address
In order to use bounce management, you need to provide an email address where the bounce messages are sent to (e.g.: bounce@example.com). This email address is usually called the Return Path. Note that this email address will only be added to the email headers, and will not be shown to your users.
$message_envelope = 'bounce@example.com;
By default this setting is commented out (it has a # in front so will not be actioned).
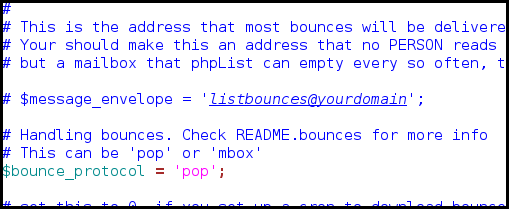
You will need to uncomment it (remove the hash) and change the email to reflect your new bounce email.
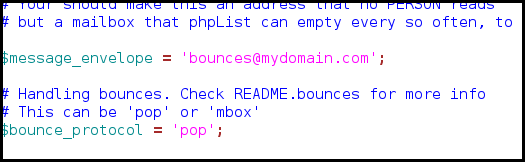
pop or mbox
phpList can fetch emails from the bounce mailbox via two protocols, mbox protocol where mails are accessed directly within a folder on the server, and pop3 protocol where mails are downloaded just like a mail client program would do it. The latter one is usually the simplest option, especially if you don’t host your phpList setup yourself.
You can specify which procotol to use in config.php with the following:
# This can be 'pop' or 'mbox'
$bounce_protocol = 'pop';
When accessing the bounce mailbox via mbox protocol, we need to tell phpList where the mbox files are. Edit config.php and add the following:
# when the protocol is mbox specify this one
# it needs to be a local file in mbox format, accessible to your webserver user
$bounce_mailbox = '/var/spool/mail/listbounces';
When accessing the bounce mailbox via pop3 protocol, we need to tell phpList which server provides the emails, and the username and password for the mailbox in config.php like this:
# when the protocol is pop, specify these three
$bounce_mailbox_host = 'pop.example.com';
$bounce_mailbox_user = 'popuser';
$bounce_mailbox_password = 'password';
Additionally, you might want to set the default pop3 port and encryption with the following line (standard config):
$bounce_mailbox_port = "110/pop3/notls";
Or enabling ssl on port 995 without verifying certificate common name of the certificate:
$bounce_mailbox_port = "995/pop3/novalidate-cert"
Setting up mailbox purge
Unless you’re doing some tests, you would want to delete bounce messages once they are fetched, so they won’t be counted twice:
$bounce_mailbox_purge = 1;
You may also want to delete messages from the mailbox that could not be processed because they do not match a user in the system. Messages are still downloaded into phpList, so it’s safe to delete them from the mailbox.
$bounce_mailbox_purge_unprocessed = 1;
You can define how many bounces in a row it needs for a user to be marked unconfirmed.
Be aware that deleting processed bounce messages from phpList with advanced bounce rules will disable this functionality.
$bounce_unsubscribe_threshold = 5
Downloading and processing bounces
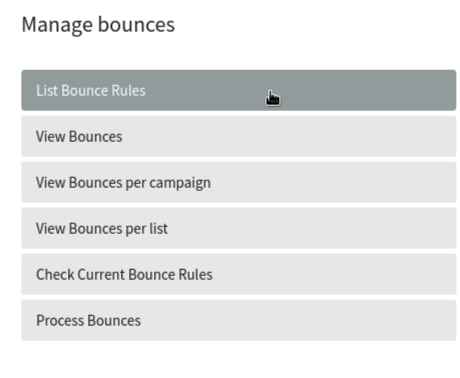
Downloading and processing bounces can be handled in the user interface under System > Process Bounces.
You may also setup a cron task to download and process bounces on a regular basis, see the chapter about cron tasks.
In that case, you might want to disable the Process Bounces menu entry by adding the following:
define ("MANUALLY_PROCESS_BOUNCES",0);
define('BLACKLIST_EMAIL_ON_BOUNCE', 1);
Advanced bounce management
Advanced bounce management enables the automatic performance of various actions depending on the kind of bounce error code that is returned by the MTA.
To enable it just add the following in config.php
define('USE_ADVANCED_BOUNCEHANDLING',1);
Once this is set up, you may proceed in the phpList interface to System > Manage Bounces > List Bounces Rules
From there you may create new bounce rules, based on regular expressions that will trigger phpList actions.
Regular expressions are sequences of characters that match a search pattern. While this manual won’t explain the use of regular expressions, we will analyse the examples given here.
Bounce emails generally contain a header and a mail body that may, depending on the MTA that sent the email, give a reason why the initial email could not reach its recipient.
An example bounce email could look like the following:
Final-Recipient: rfc822; someuser@example.com
Original-Recipient: rfc822;someuser@example.com
Action: failed
Status: 5.2.1
Remote-MTA: dns; mx1.example.com
Diagnostic-Code: smtp; 550 5.2.1 This mailbox has been blocked due to
inactivity (UserSearch)
What we see here is the recipient’s MTA telling us that the user’s mailbox is blocked, probably because it’s not been used for a long while. There are some excellent articles about MTA responses on the internet. Every MTA programme has its own return messages. Also, you may have noticed that the return messages usually come with a 3 digit code, 5.2.2 in this example.
This code is the error code corresponding to the return message, but some MTAs just give bogus codes, especially when they think your email is spam.
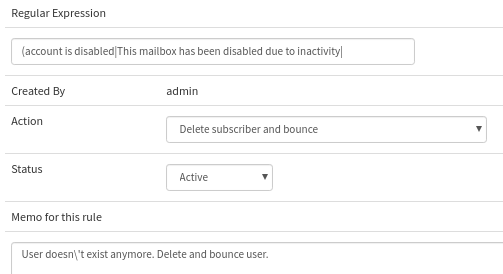
Now let’s create our first bounce rule:
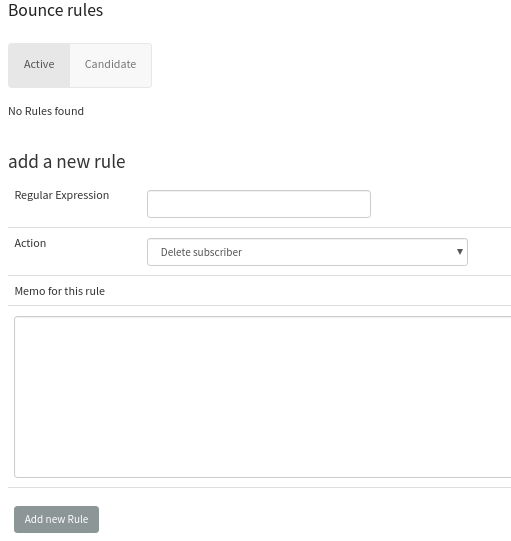
The regular expression could be the exact sentence the MTA return message contained, in brackets.
Now phpList provides multiple actions that can be triggered if a bounce email matches our regular expression:
- Delete subscriber
- Unconfirm subscriber
- Blacklist subscriber
- Blacklist email address
- Delete subscriber and bounce
- Unconfirm subscriber and delete bounce
- Add subscriber to the do-not-send list and delete bounce
- Add email address to the do-not-send list and delete bounce
- Delete bounce.
In our case, we can assume that our subscriber’s email address haven’t been used for a long while, and that it’s safe to unconfirm the subscriber.
Now we have a choice between “unconfirm subscriber” and “unconfirm subscriber and delete bounce”. The only real difference between both options is that deleting the bounce message will also remove it from bounce statistics (using the BounceStatisticsPlugin).
Once we finished our rule, we may add it and try it against our bounces.
Back in phpList, we can check if our rule matches any of our actual bounces, by going to System > Manage Bounces > Check Current Bounce Rules.
The system will then tell us how many bounces are caught by our rules.
Now you may have a big list of bounces that aren't caught by the rule, and some of them are pretty similar to the rule.
We may have multiple bounce messages that could say “account is disabled” or “This account has been disabled” which basically means the same as “mailbox has been blocked due to inactivity” of our first rule.
Way may create two other rules to deal with these bounces, or improve our regular expression to match all these messages with the same rule.
Regular expressions use the pipe symbol “|” as OR statement, meaning the following regular expression:
(black|white) would match any text that has the words black or white in it.
Now let’s improve our first rule by adding all our MTA return messages that basically mean the same thing:
The actual regular expression I used here is:
(account is disabled|This mailbox has been blocked due to inactivity|This account has been disabled|The email account that you tried to reach does not exist|This is a permanent error .* local delivery failed)
Note that the .* is a wildcard token that means there can be up to zero characters between “This is a permanent error “ and “ local delivery failed”.
This rule can now deal with any of these 5 return messages.
Good starter rule set:
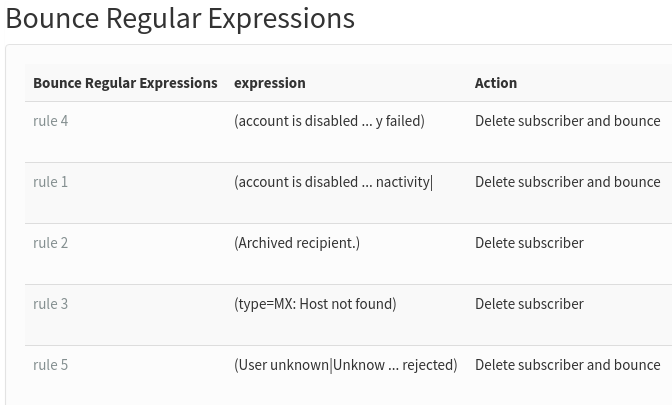
Rules to copy
(Archived recipient.) Delete subscriber
(delivery error: dd This user doesn't have a yahoo.fr account|This user doesn't have a yahoo\.fr account) Delete subscriber
(type=MX: Host not found) Delete subscriber. No mail records for the domain.
(sorry, no mailbox here by that name|Mailbox disabled|address not found in table|User mailbox is not local|mailbox not allowed|Mailbox syntax incorrect|RESOLVER\.ADR\.RecipNotFound) Delete subscriber and bounce. No ambiguity here, we can also delete the bounce message.
(account is disabled|This mailbox has been blocked due to inactivity|This account has been disabled|The email account that you tried to reach does not exist|This is a permanent error .* local delivery failed) Delete subscriber and bounce. Same as above
(User unknown|Unknown user|Unknown address|No such recipient|No such user|The email account that you tried to reach is disabled|Recipient not found|Recipient unknown|Invalid recipient|Address unknown|Recipient address rejected) Delete subscriber and bounce. Same as above
Feedback
Discuss this chapter here.