Installing using an auto-installer
This page concerns phpList self-hosted users only. If you have a registered account at the phpList Hosted service, please contact hosted@phpList.com.
Softaculous, Fantastico, etc
If your web provider offers Softaculous, Fantastico or other similar software installers, then you may choose to use the. These installers do the bulk of the work for you and can be faster than installing phpList manually.
Log on to your web space, (cPanel/Plesk etc) and click on Softaculous/Fantastico then find the phpList installation and choose the Install option. Please note, for this example I have used Softaculous installer.
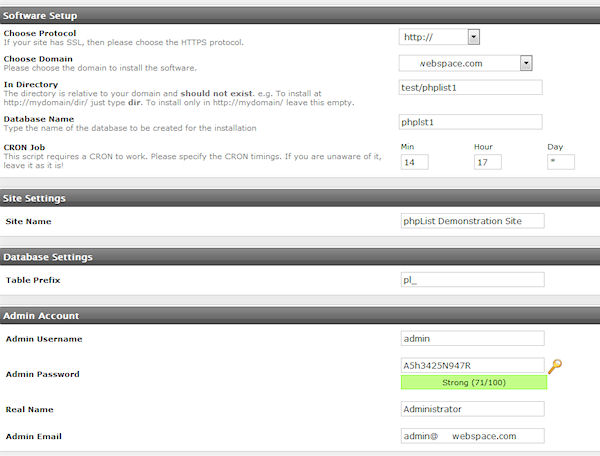
On the Install page you can choose your settings. In the order shown in the image:
- Protocol http:// is the norm
- Domain if you have more than one domain on your hosting/web space, choose that here
- Directory you should set the directory that you wish your phpList installation to be placed in. This should usually be left blank however in this example we are using test/phplist1. Any variations will become part of the URL to your phpList install, so it is best to keep it simple
- A database name is suggested next. You may change it within limits to a name that makes more sense to you if you wish. 8 characters are usually the maximum here as it will be prefixed to your hosting username (eg:user234_phplst1 in my example).
Important! If you have only one database available to all your websites, then it is very important to use a unique identifier here, one that makes sense to you as belonging to this phpList installation. If you have access to a number of databases, then it's an advantage to use one per installation.
- Ignore the settings for the Cron job for the time being, there is some information on this in a later chapter
- Site Settings: chose the name for your site, and change the default Table Prefix if you wish
- Finally, enter your username (admin by default), user password, make it a good strong one. Real name and email and then click on the Install button.
Wait for it to complete installing your phpList and you will get a final page offering the links to the public "front end" and the Admin "back end"
That's it, you've installed phpList with Softaculous or Fantastico.
One final thing to remember is that if you install phpList using this method, you can update phpList to a later version in a matter of minutes via the Update option offered in Softaculous/Fantastic. Do however make a backup of your config/config.php file before starting the update especially if you have customised your settings.
Feedback
Discuss this chapter here.